As I wrote in, How to Capture Brian Setzer’s Tone, I bought a 1963 Fender Bassman head in my quest for tonal nirvana. In a further attempt to deliver the goods, I bought a barely used Mojoton 2×12 cabinet. Though this combination sounded good, it looked like it had been pieced together from parts sourced on Ebay and online classifieds which, of course, it had.
I’m far too obsessive to let mismatched components coexist under my care, so I did what any obsessive nerd would do. I set out to completely change everything.
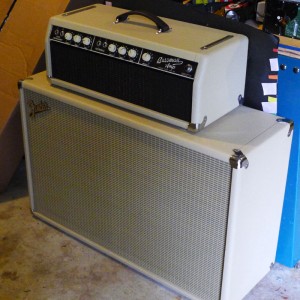
The cabinet I’d bought was designed to look like an original 1963 Fender Bassman cabinet, which was cool and all, but I’ve never been a fan of the all-blonde look. What really does it for me is the blonde/oxblood combination found on the earlier 1962 Bassmans. Though my amp wouldn’t be historically accurate, I thought this combination would look killer, so I set out to get what I needed in order to make my vision a reality.
New Mojo Head Cabinet
The first step was easy, or at least it should have been. I ordered a new head shell from Mojo Musical Supply in matching Blonde tolex and oxblood cloth. Since the cabinet was from Mojo, the tolex was a perfect match for my cabinet. It should have been easy because I thought that the amp chassis should have just slid right in. I was wrong.
For reasons that I can’t fathom, Mojo ships these head cabinets without mounting holes. That meant I had to figure out where the holes should be and drill them myself. I’m no carpenter, so that proved to be a bit of a challenge for me. I measured probably 38 times, drilled my holes, and managed to get it right, but it was a pain. Threading the long bolts through the chassis is not a fun job to begin with since one of them is almost completely obscured by the transformer. Suffice to say the chassis is in the new cabinet and it looks great. As I would come to learn, that was the easy part after all.
New Grill for the Mojo Speaker Cabinet
Next I needed to replace the grill on the speaker cabinet. That seemed simple enough, but again my optimism was misguided. I learned some tips and tricks with my Google-Fu (which is strong) but as with most things in life, figuring out what knowledge was useful was a challenge.
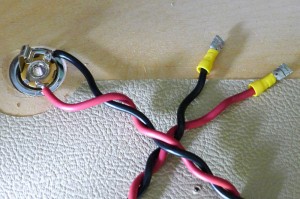
Since I was using all Mojo cabinets, making sure the grill cloth matched was as simple as ordering a couple yards of matching oxblood cloth. In order to get the old fabric off, I had to just about disassemble the entire speaker cabinet. Since this is a closed back cabinet, the the back is held on with 480,000 screws. Luckily I have power tools and a 10-year-old who likes to help. If you have a similar cabinet, be careful when you take the back off. The speaker jack on the back panel is wired to one of the speakers with a length of wire that is far too short. If you pull the back off and put it on the ground, you’ll likely yank the wire leads right off the speaker, possibly damaging those leads in the process.
Inside the speaker cabinet I found another six thousand screws (18 really), but these bad boys had a special head that a regular phillips or flat-head screwdriver wouldn’t budge. After a couple of trips to the hardware store, I figured out that I needed a #2 square bit. Naturally I now have a set of #1, #2 and #3 square bits. In my defense, it’s not like I could take the whole speaker cabinet to the hardware store with me. My Google-Fu is strong. My arms, not so much. Since these screws are deep inside the cabinet, and right against the edge, I also needed an extension for my drill. At least I was smart enough to get that on the first trip.
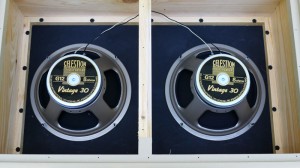
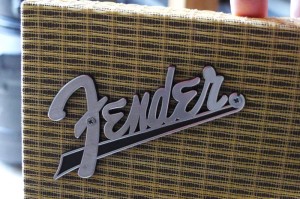
Once all these screws were removed, I was able to pick up the cabinet, leaving the speaker baffle on the floor. Since I needed to remove the speakers, I inverted the cabinet and put the baffle in the cabinet upside-down, which provided a nice little desk to work on the speakers. After carefully removing the speaker wires (I’ve pulled the wire braid right out of the cone in the past – these terminals are far more fragile than they look), and four nuts for each speaker, I was able to remove the speakers and put them in a safe place. With the speakers out of the way, I removed the Fender badge from the front, and carefully stored the screws. I was now ready to tackle the worst part of this job: removing the existing speaker grill.
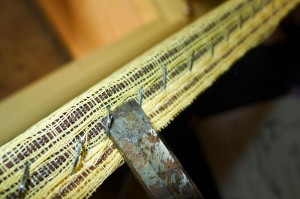
On every speaker baffle I’ve ever seen, the speaker grill is secured by countless staples. Every single one of these staples must be removed. Every… single… one. There is no easy way to do this that I’ve found, and to address the inevitable question, no, a staple remover will not work. These are not office staples keeping homework together; these are upholstery staples that have been pounded into plywood with a pneumatic stapler. I found that an old chisel worked best. Any tool that’s tough, but with a sharp edge and a right angle should do the trick. I got into a rhythm that went something like this:
- Pound the corner of the chisel under the staple
- Lift up the staple
- Repeat for 10 staples
- Go back with pliers and pull out those 10 staples
- Scream obscenities
- Take a break while contemplating a life devoid of guitar amp restoration projects
- Repeat
This step can take hours, and it is a maddening process. I found that continuously screaming obscenities helped to pass the time. Listening to music helps, but that only serves to block some of the salty language from reaching others. To that end, the music should be loud during this step.
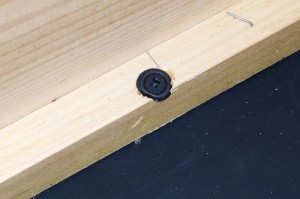
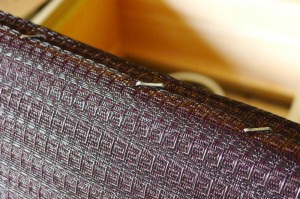
With the old grill off, it was time to put on the new grill. Let me warn you up front, that there is a good chance that your staple gun isn’t up to the task. Remember, we’re driving staples into plywood here, and power is the key. Also remember that you you’ll need to drive a lot of staples, so if you’re using one of those manual staplers, you better have a grip of steel, because you’ll be crying home to momma after you finish the first side. I went and bought the most powerful electric stapler I could find. Neither Lowes nor Home Depot carried a pnuematic stapler that would take smaller 5/8″ staples, so please keep your should have used a pneumatic stapler comments to yourself. Even with the electric stapler, I had to tap all the staples in with a hammer. As a result, I don’t have a stapler to recommend. Look at the staples in the picture to the right. These are not good enough. For the grill to be secured, the top part of the staple must be flat against the grill. After stapling, I had to follow up with a hammer and tap each staple in so that the top was flat against the cloth.
The hardest part about putting the new grill cloth on was keeping it straight. Since the oxblood cloth has a pattern, it was important to get the first side on straight. This was not an easy task, since even a slight mistake was amplified over the length of the baffle. Don’t be afraid to pull the staples if you make a mistake. As long as you don’t tear the fabric, you can staple it again. The stuff I was using was sort of a nylon mesh, and it was hard on my knuckles, which resulted in more colorful language. The key is to pull it as taught as possible while keeping it straight, while simultaneously stapling. You’ll need roughly three hands and a lot of patience. This is where a powered stapler pays off, because quick and easy is a real benefit while maintaining straight tension. I found that putting in enough staples to keep it aligned, then adding more when it was stable seemed to work well. In the end, there should be about one staple every inch, just like we saw on the original baffle. The last thing you want is for the cloth to pull loose at a gig. Fewer staples will also result in the cloth rippling, which looks terrible.
There are many conflicting articles online about the order in which the sides should be stapled. I found that doing one of the long sides, followed by the opposite side, and then doing the short sides worked for me. All that matters is that the pattern on the grill remains straight. I simply folded over the corners and stapled them down. Finally, I cut off all the excess with a box cutter. Make sure that your cutter is sharp or you’ll end up ripping the fabric.
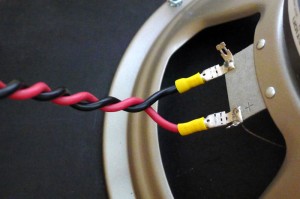
With the new grill cloth on, I set out to rewire the speakers. I wanted to put in 12-guage wire and add a bit more length to the connection to prevent it from ripping off when removing the back cover. I was going to solder the wires, but the 12 gauge wire did not fit into the speaker terminal holes, so I settled for automotive spade connectors instead. After attaching the speakers back to the baffle, I set out to prepare my wire.
To twist the wires together, I cut a matching length of black and red, put one end in a vice, and put the other end into my cordless drill. I then spun the wires together until the desired twist was achieved. This makes the wire pair manageable, and it looks great to boot. Just remember to clip off the ends that were in the vice and the drill, since the wire and/or insulation may be damaged. Remember also that after you twist the wires together, the overall length of the pair will be shorter than when you started. It’s always better to have too much and cut some off than to have too little and have to use more wire.
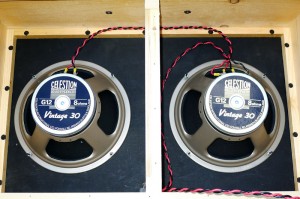
This cabinet had the speakers wired in parallel, which meant that the positive terminal on one speaker was connected to the positive terminal on the other speaker. This scheme results in two 8-Ohm speakers having a net impedance of 4-Ohms, which is perfect for the ’63 Bassman amp. I toyed with the idea of actually running both speakers directly to the input jack, but given the thickness of the wire I used, it just wasn’t possible to solder that much wire to the jack. Instead, I wired the jack to one speaker, then using the other terminals, wired that speaker to the other speaker. My obsessive side really wanted to run separate leads to each speaker, but there really would be no benefit to doing so, so I let it go and moved on.
With the speakers all wired up, I screwed the baffle back on the cabinet and tested my work. After diagnosing a blown tube, I found that everything worked, and now looked even better. With only one step left, I set out to put the Fender badges back on. After I finished, I stood it up to admire my work. I was a bit confused at first because the badge that I’d just attached wasn’t there. Can you see what went wrong? Needless to say, we all had a good laugh at my expense that day.
Apparently the baffle can go in either way, but only one corner has the necessary wood that allows the badge to be installed. Naturally I didn’t notice this until every last screw has been put in, so I had to take the entire thing apart, flip the baffle and then reassemble it. Hey, at least I’d left enough wire so that there was plenty of slack when I took the back off. I think I would have given up and left it that way if I had to turn all those screws by hand. Thank God for power tools and ten-year-olds.
Finally, I put the badge on the new head cabinet. I was floored by the difference in quality from the original metal 1963 badge and the modern plastic badge. Lining up the old metal badge on the new Mojo cabinet was another carpentry challenge, but I got it in there and I think it looks great.
The only thing I don’t like about the Mojo cabinets is that all the old-school Bassman piggyback features are missing. The two cabinets do not latch together, there are no tilt-back legs, and the head cabinet does not have a recess for the speaker-cabinet’s handle. With the exception of the handle recess, I can score those parts on Ebay, but honestly, I doubt that I’d ever tilt the amp anyway.
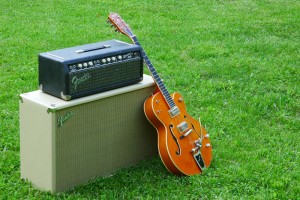
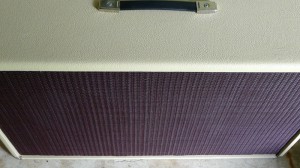
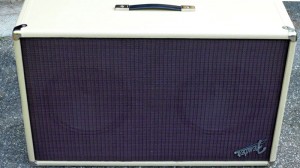
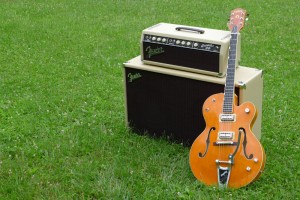
After getting it all put together and testing it out, I set it up in the yard for a final picture. I think it looks a lot better than it did when I started. I love the contrast of the blonde tolex against the oxblood grill. With the amp looking this great, I thought I was done working on it. As it turns out, it needed some internal work done, but that’s a tale for another time. What do you think of the new look?


Honestly,I do not know what planet you come from using tools and words I did not know existed.
After reading all that (it made little sense to me) & this coming from a what was a teenager that had a room so messy that word was out that if you entered Gary`s messy room that if you saw anything that moved on the floor to step on it & kill it as could be a very tiny zombie.
This non caring child grew to be intelligent and an expert in designing and building of Data Centers and heaven forbid that each & every tiny bit of material was not placed perfectly let alone drawings & photos taken of every installation.
All this from a teenager that grew to be a fanatic about neatness and perfection despite the fact he grew up in a room so cluttered that there were indeed tiny zombies in and around bedroom carpet.
Now I expected this Rambling to show a bride and groom in front of a mansion. Indeed did see photo of a married guitar and something with it looking odd. Surely a marriage of sorts.
JADG
Where did you find 3/16″ spade connectors that would take 12 gauge wire? I can only find 14-16 gauge connectors that fit 3/16″. Bigger gauges seem to only come in 1/4″. Also, did you use hook up wire instead of speaker wire?
I bought all the spade connectors and wire at an automotive store. If you look closely at this picture, you’ll see that they’re not the right size for the spade connectors. I have considered going back in and soldering it all together, but it hasn’t fallen apart yet.
Thanks for the info! You’re blog has inspired me and I picked up a ’63 Bassman and cabinet to go with my 6120 SSU. The head is 100% original and needs new tubes, caps, cord, and cleaning – which I have contacted an amp tech to do. The cab had a single 15″ which I am converting to twin Vintage 30s. I even picked up the Strymon El Capstan and the Nocturne Dyno Brain. Thanks again!
Hey, Que pasa? last week,Easter weekend, I bought a very clean ’64 BF head,the next day I grabbed a ’63 blond 2-12 cab w/’68 Jensens…looked like your rig originally,black on blonde..sounds good!
Great Stuuff! Just came across this Blog as I have my fathers old Fender speakers (No cab), and also his old vintage reverb head and getting those speakers in a cab is my new little project! Good to see what you’ve done and inspired me a bit more to keep goin!
Also, Question- what kind of wire did you use for connecting your speakers? I bought the connectors but curious if I can just use ordinary speaker wire (and at what gage?) to connect these (in parallel). Thanks !!
I used 12-gauge automotive wire (see the article) but note that this did not fit in the solder lugs on the speakers so I ended up using crimp connectors which I usually don’t like. Any decent 14-gauge wire will be fine (12 is serious overkill). I like automotive wire because it’s colored though I had to twist it myself which can be a pain. Just make sure you keep the polarity correct when wiring inside a cab.
I have a ’67 Fender blackface Bassman cabinet with two grayback JBL D120f’s. Looks like it comes apart the way your Mojo did. I want to remove the speakers to check their condition. I see nuts on the back of the speaker frames. Shining a flashlight thru the front of the grill, I see what looks like the heads of Phillips screws. Can’t get to them because the grill cloth is wrapped around the baffle board, like you described (I think). Are the screws captive? Afraid to remove the nuts, because if they aren’t, they may fall between the grill and the baffle, where I can’t get at them without removing the grill cloth. Please advise.