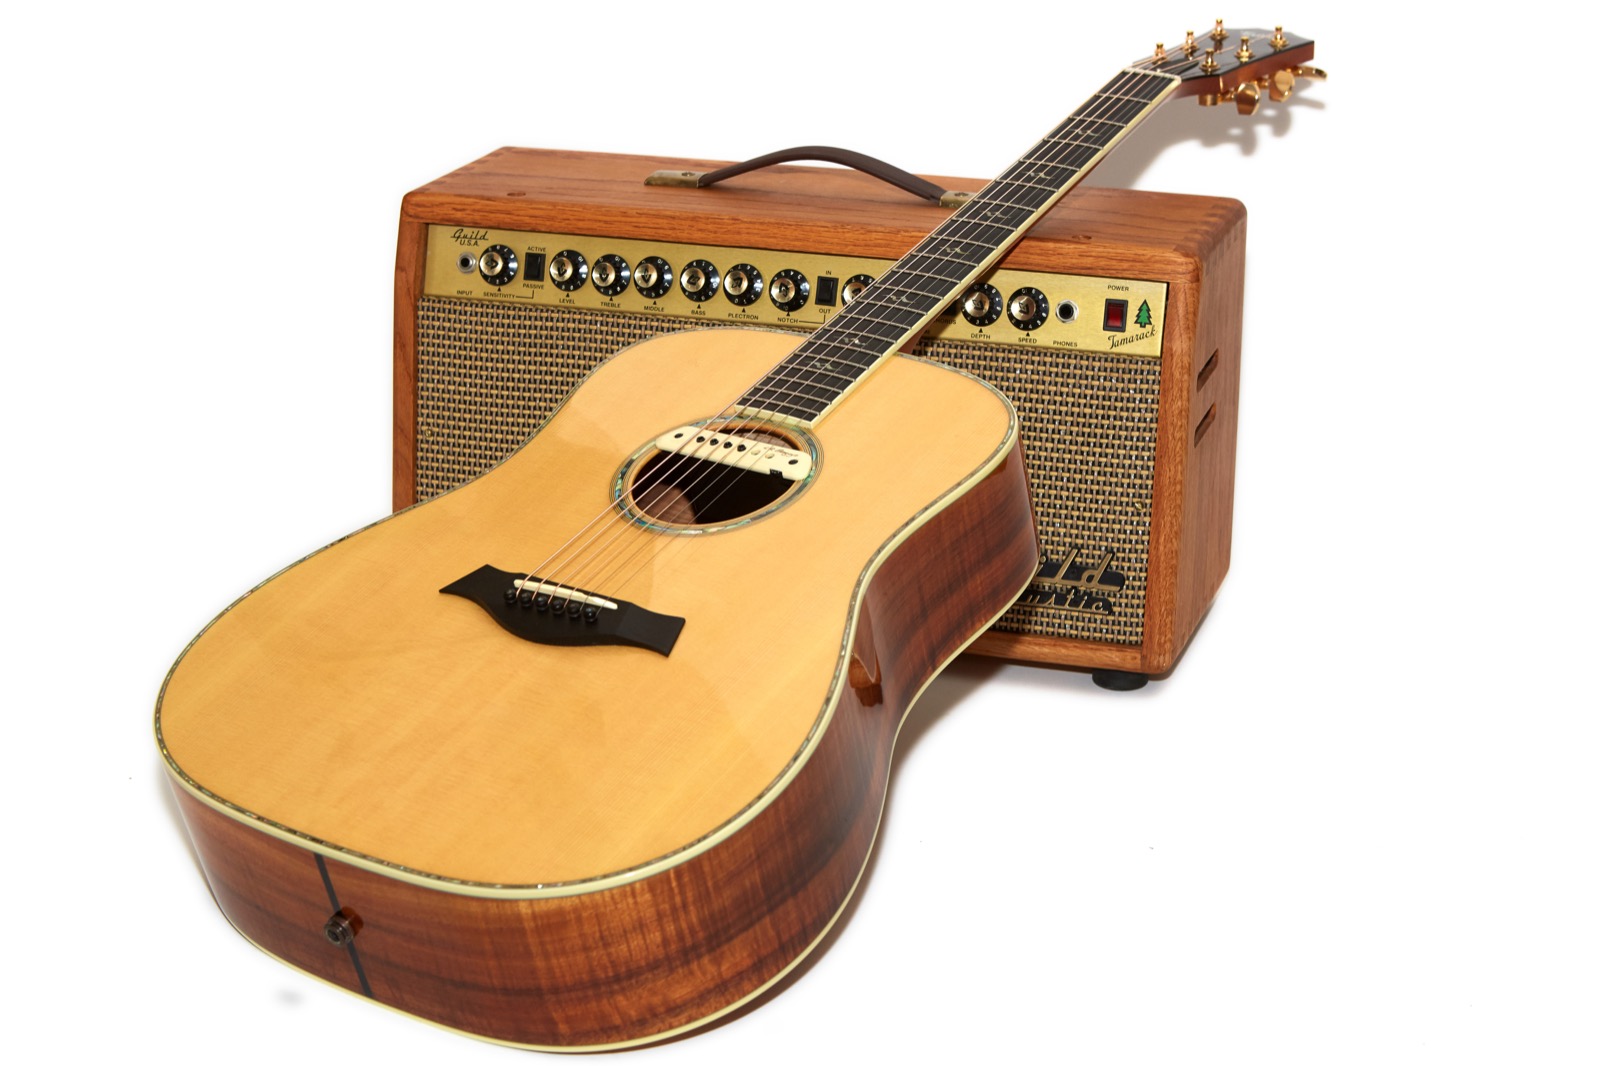
 I scored this little amp from a new shop in Nazareth, PA which allowed me to drive there and save not only the Paypal fees, but shipping as well. I kind of went in blind having never played a Guild acoustic amp before, but he let me try it and all the knobs appeared to work so I walked out with a good deal on this circa 1993 Guild G300 Tamarack acoustic amplifier.
I tore it apart, gave it a look, fixed the fiddly bits, cleaned up the enclosure and put it through the review process. Let’s see what I was able to learn about this cool little acoustic amp from Guild.
Intro
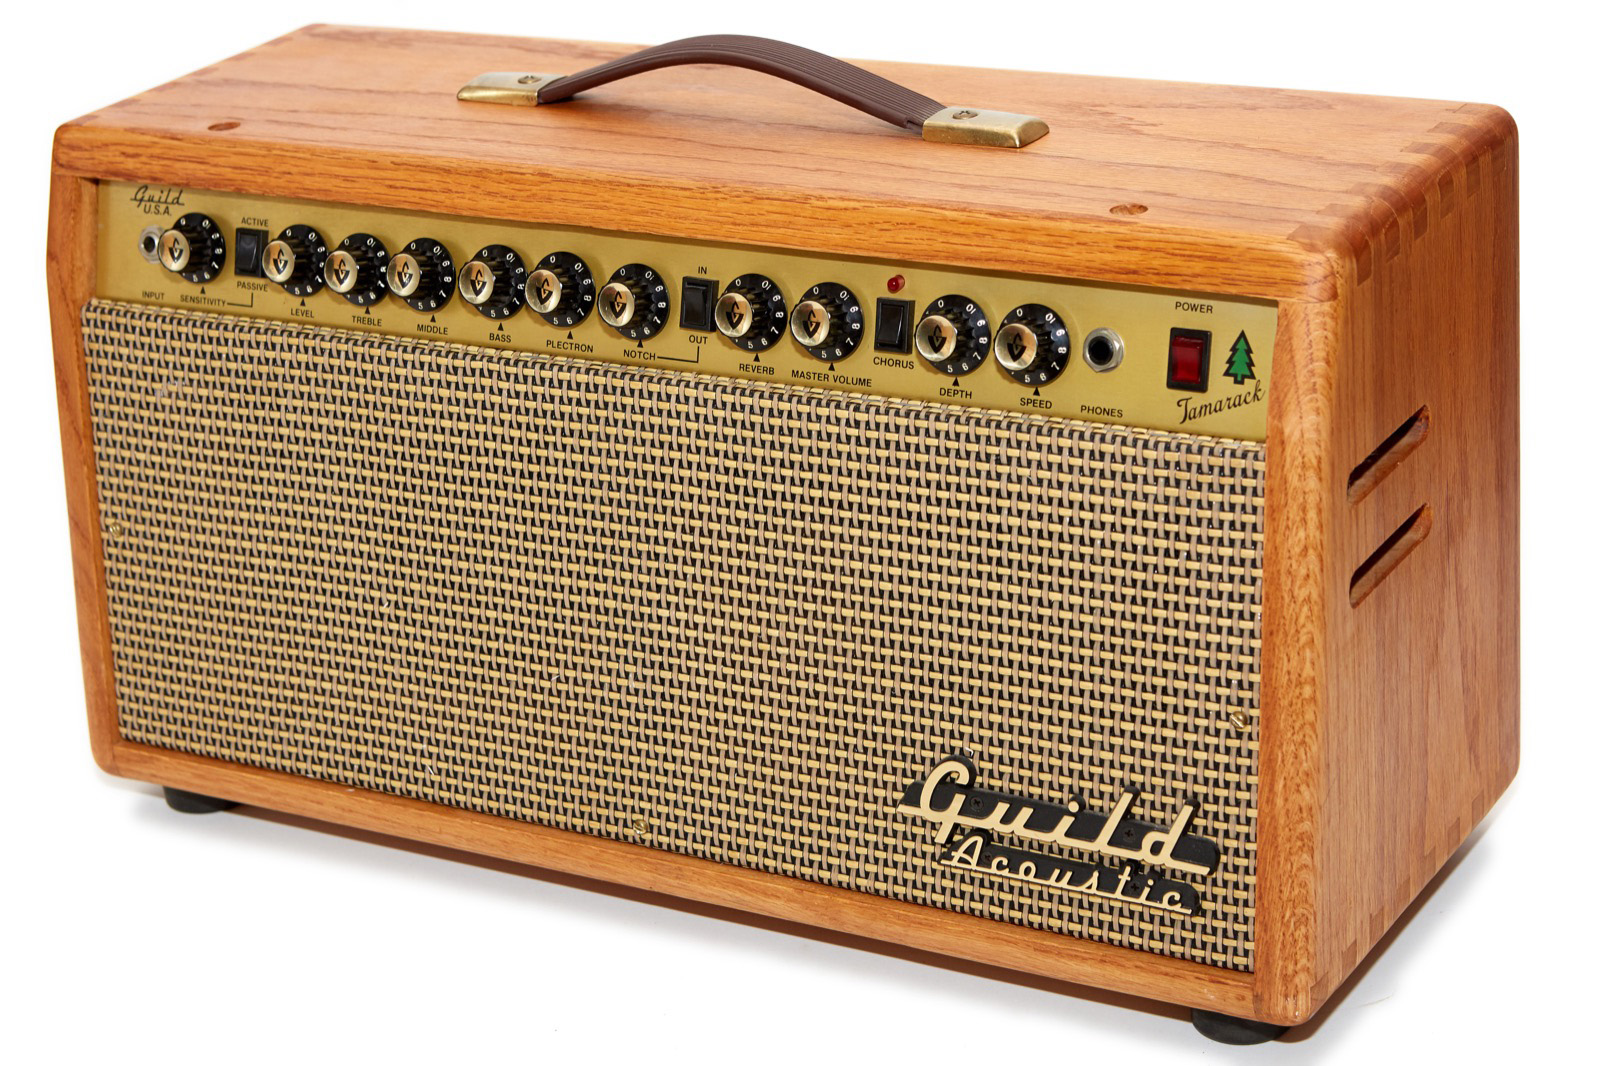
![]() Around 1992 or so, Guild introduced the Timberline series of acoustic guitar amps. Named after various trees and all but one (well, maybe two) made out of luxurious solid oak, these amps are quite eye-catching in the same way that a hardwood encased cane-grill Mesa Boogies are. These are very classy looking amps and comments on various guitar forums often include statements like “this is the prettiest amp I’ve ever seen.”
Around 1992 or so, Guild introduced the Timberline series of acoustic guitar amps. Named after various trees and all but one (well, maybe two) made out of luxurious solid oak, these amps are quite eye-catching in the same way that a hardwood encased cane-grill Mesa Boogies are. These are very classy looking amps and comments on various guitar forums often include statements like “this is the prettiest amp I’ve ever seen.”
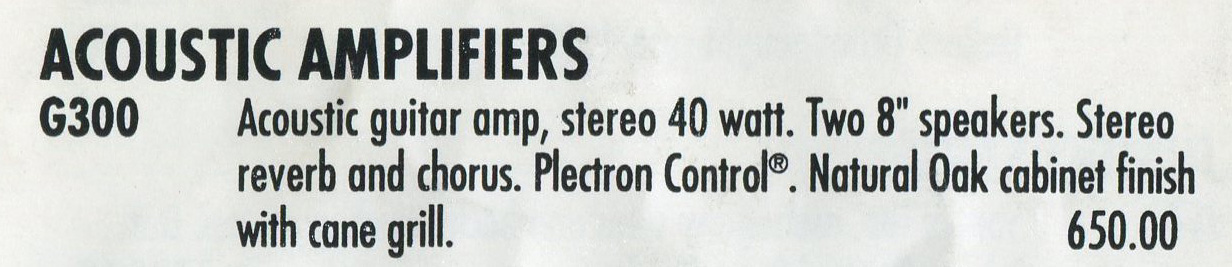 The G300 Tamarack is listed at $650 in the 1993 price guide. If you’d like to learn more about the entire line of Guild Timberline acoustic amplifiers, check out my article here, but for this article I’m going to dig into the G300 Tamarack right down to the components on the board.
Features
 This is a stereo amplifier sporting 20 watts per channel with two eight inch speakers and one tweeter. It has an input-matching preamp for active or passive instruments, and my input-matching they mean that you have to match the input manually with the Active/Passive switch on the front.
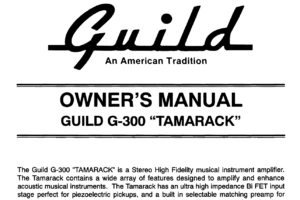
I found the manual for this amplifier on Randall’s archive page, and kudos to Randall for keeping all that old material available. Click on the image of the manual to the right to get a local copy in PDF format. The manual isn’t great, but it does explain what the knobs do which I’ll cover in detail below in the controls section.
 This amp has an actual spring reverb tank along with a chorus that sounds pretty good when you dial it in right and pretty darn awful when you don’t.
This amp has a headphone jack which I normally think is a really cool option, but this is a headphone jack on an amp that’s amplifying an acoustic instrument which seems odd to me. I mean, if you want to hear your acoustic guitar, just listen to it! Still, the headphone jack does allow you to hear things like the chorus and reverb, so I suppose that’s kind of cool.
It’s designed to be more of a grab-and-go type of solution or one for places where space is at a premium, so it doesn’t have a lot of the expansion-type features found on larger amps like connections for speakers or effects loops on the back. Similarly, this amp does not support a foot pedal, so you’ll have to adjust and enable/disable the reverb and chorus from the front panel by hand.
Cabinet and Grill
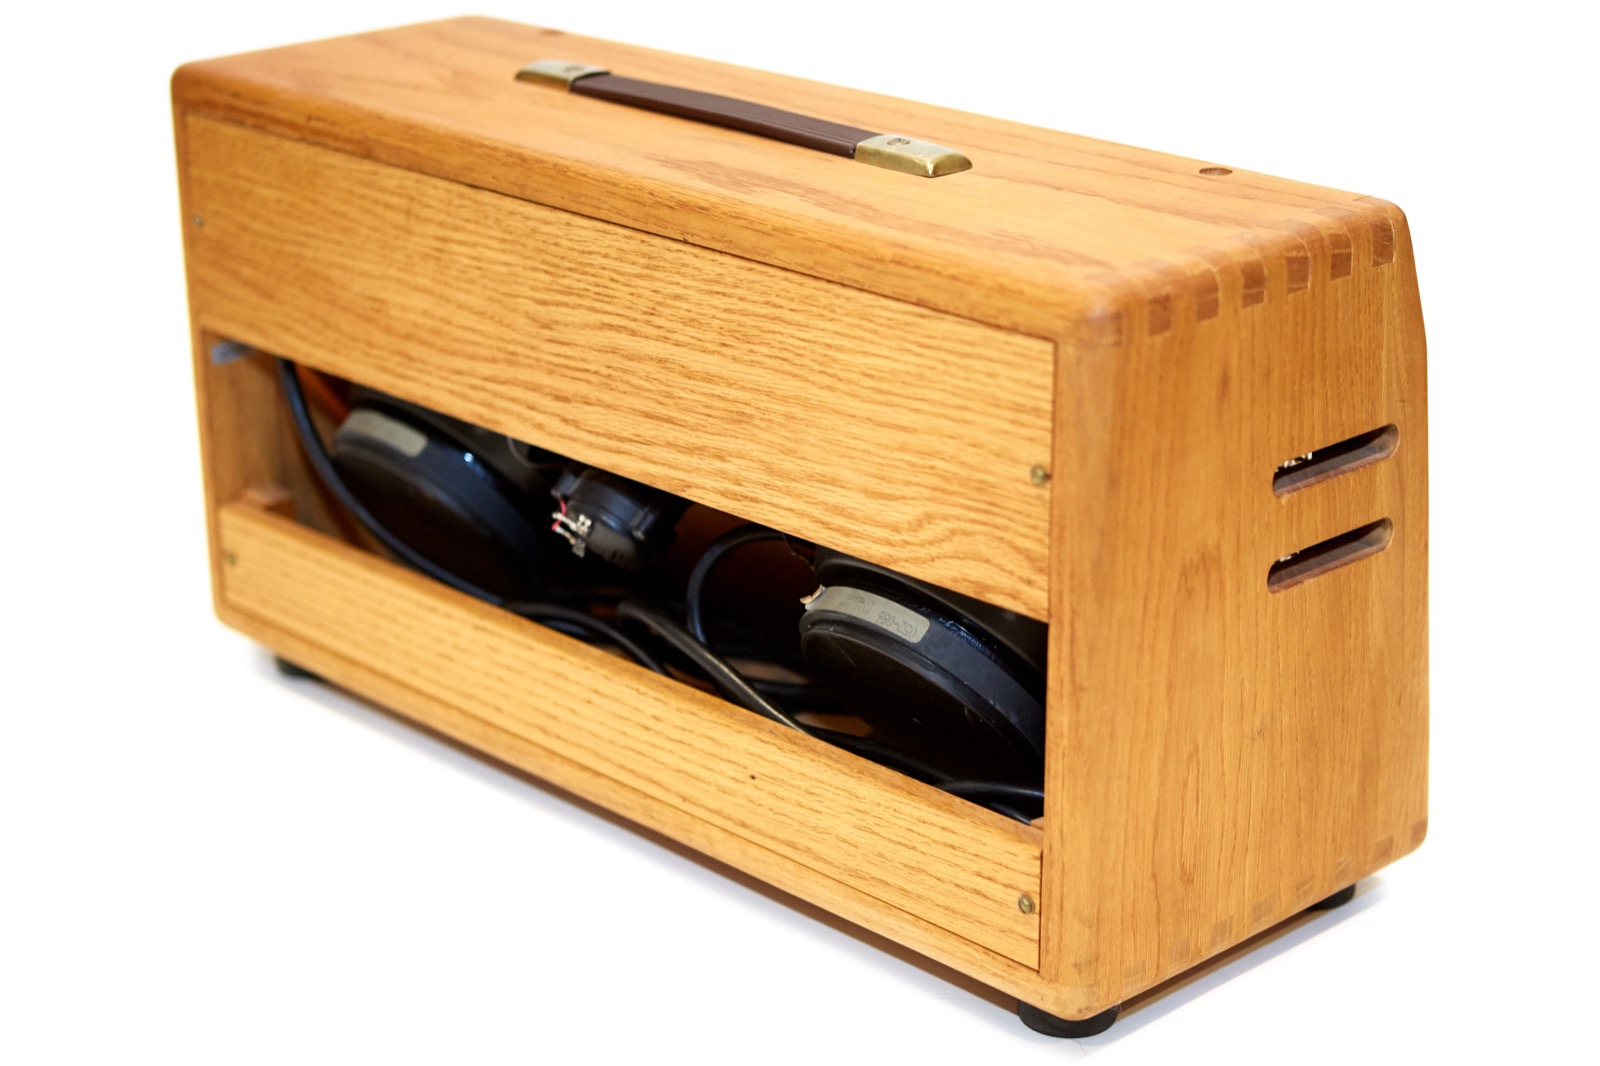
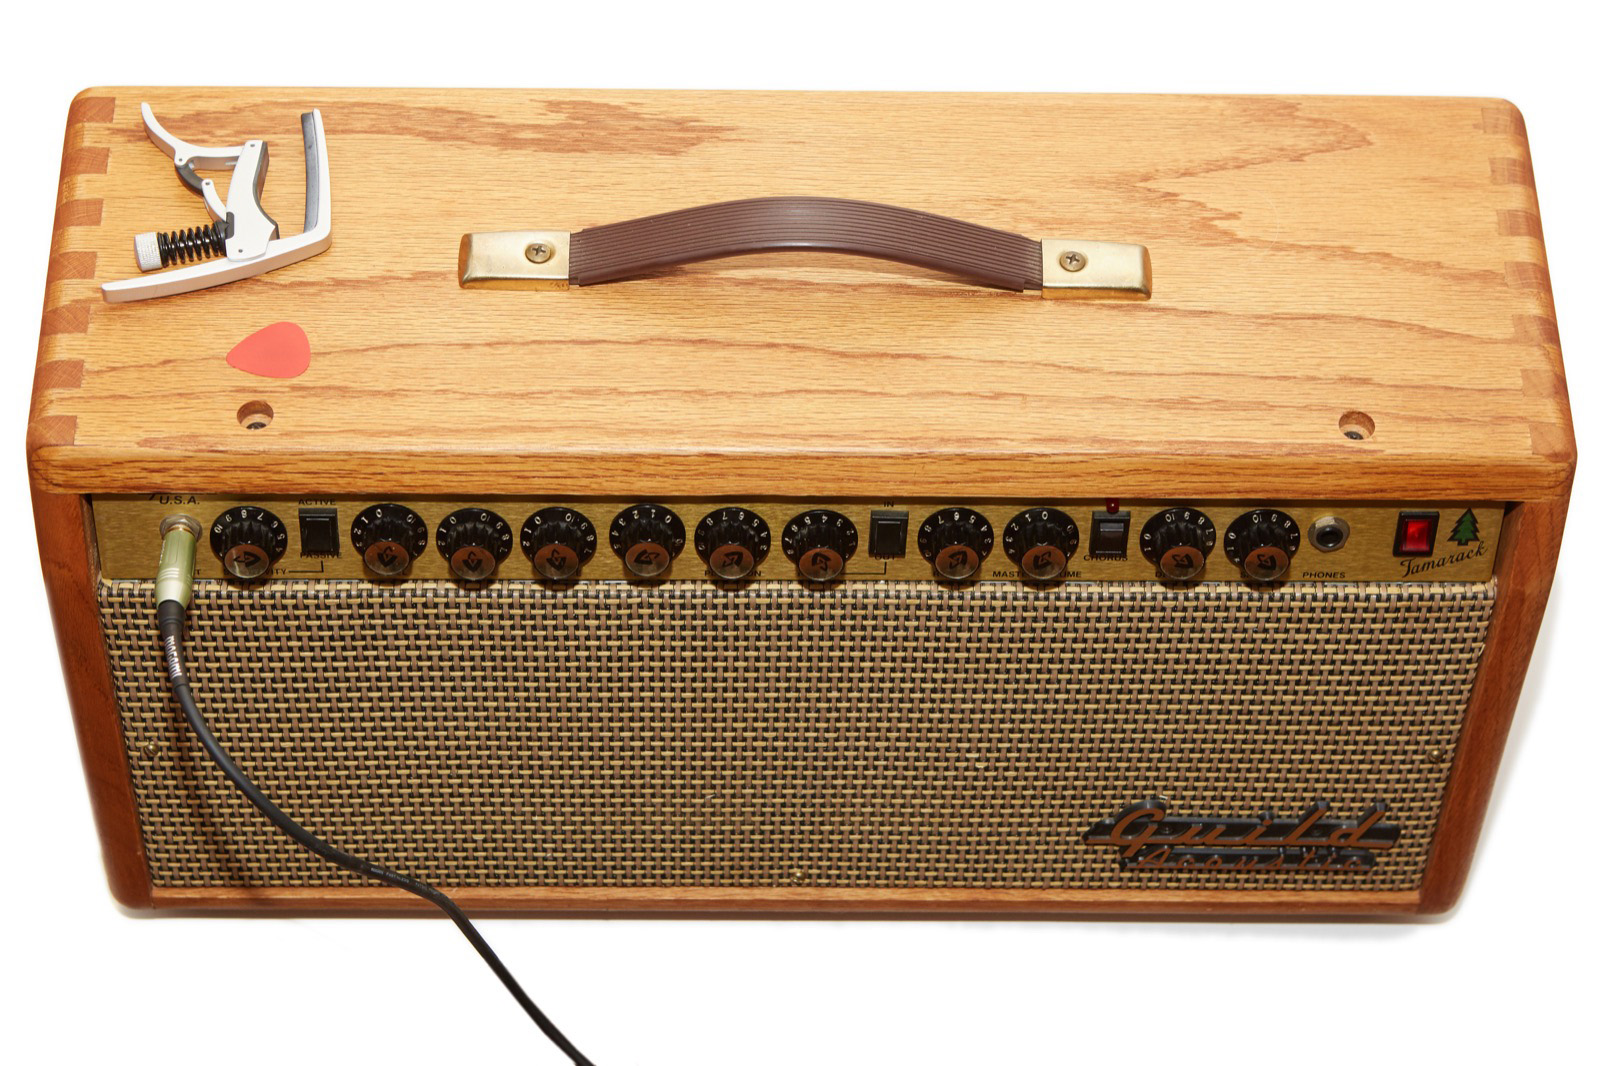
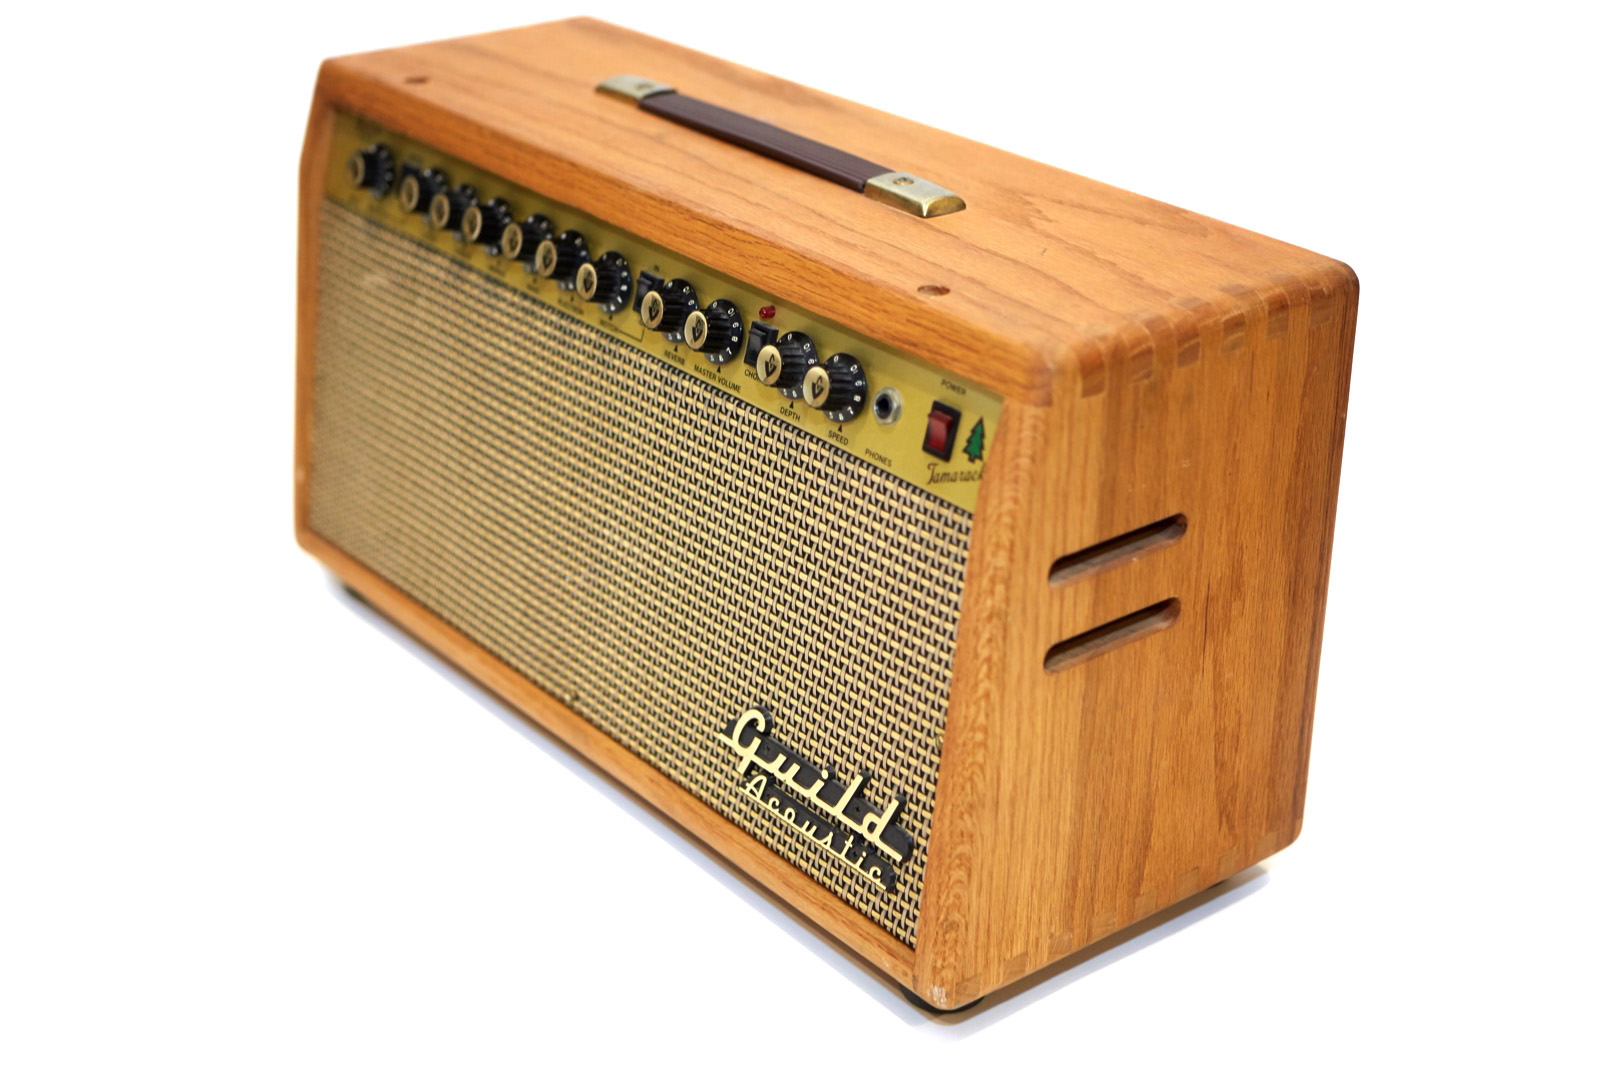 The cabinet on this amp is oak, and it’s not plywood or a veneer; it’s solid hardwood and the amp weighs a solid 28 pounds in large part because of this. The cabinet is open with two removable panels on the back and has two little vents on each side. When I got this amp the wood cabinet was a bit worn and looked like a wooden stool that had been in a preschool for 10 years. It was still intact and didn’t look all that bad, but it looked like it had oil rubbed into it from 1,000 little hands.
Originally I assumed that the slots in the side of the cabinet were for cooling, but it didn’t click in my head that the amplifier sits higher than those slots and since there are no tubes hanging down in that space, the slots would be all but useless for that purpose.The slots are actually part of the Acoustic Recessed Cabinet (ACT) system which couples slant-back speaker baffles with tuned sidewall venting to provide true acoustic realism. You know, as opposed to false acoustic realism. In short, the little slots supposedly make the amp sound better.
All of these amps originally came with gold on brown Guild-emblazoned cover when new, but sadly mine did not come with this cover which likely explains why the cabiet was so oily and sort of old looking. I took the entire amp apart including the feet and handle and sanded the cabinet lightly enough to smooth out the rough spots and to lighten up the wood a bit, then rubbed it down with lemon oil and polish. It now looks quite refined sitting in my home office on the hardwood floor.
On the top you’ll notice two round holes. These were originally plugged with oak plugs which have been lost over time. I will replace them when i get a chance to order some.
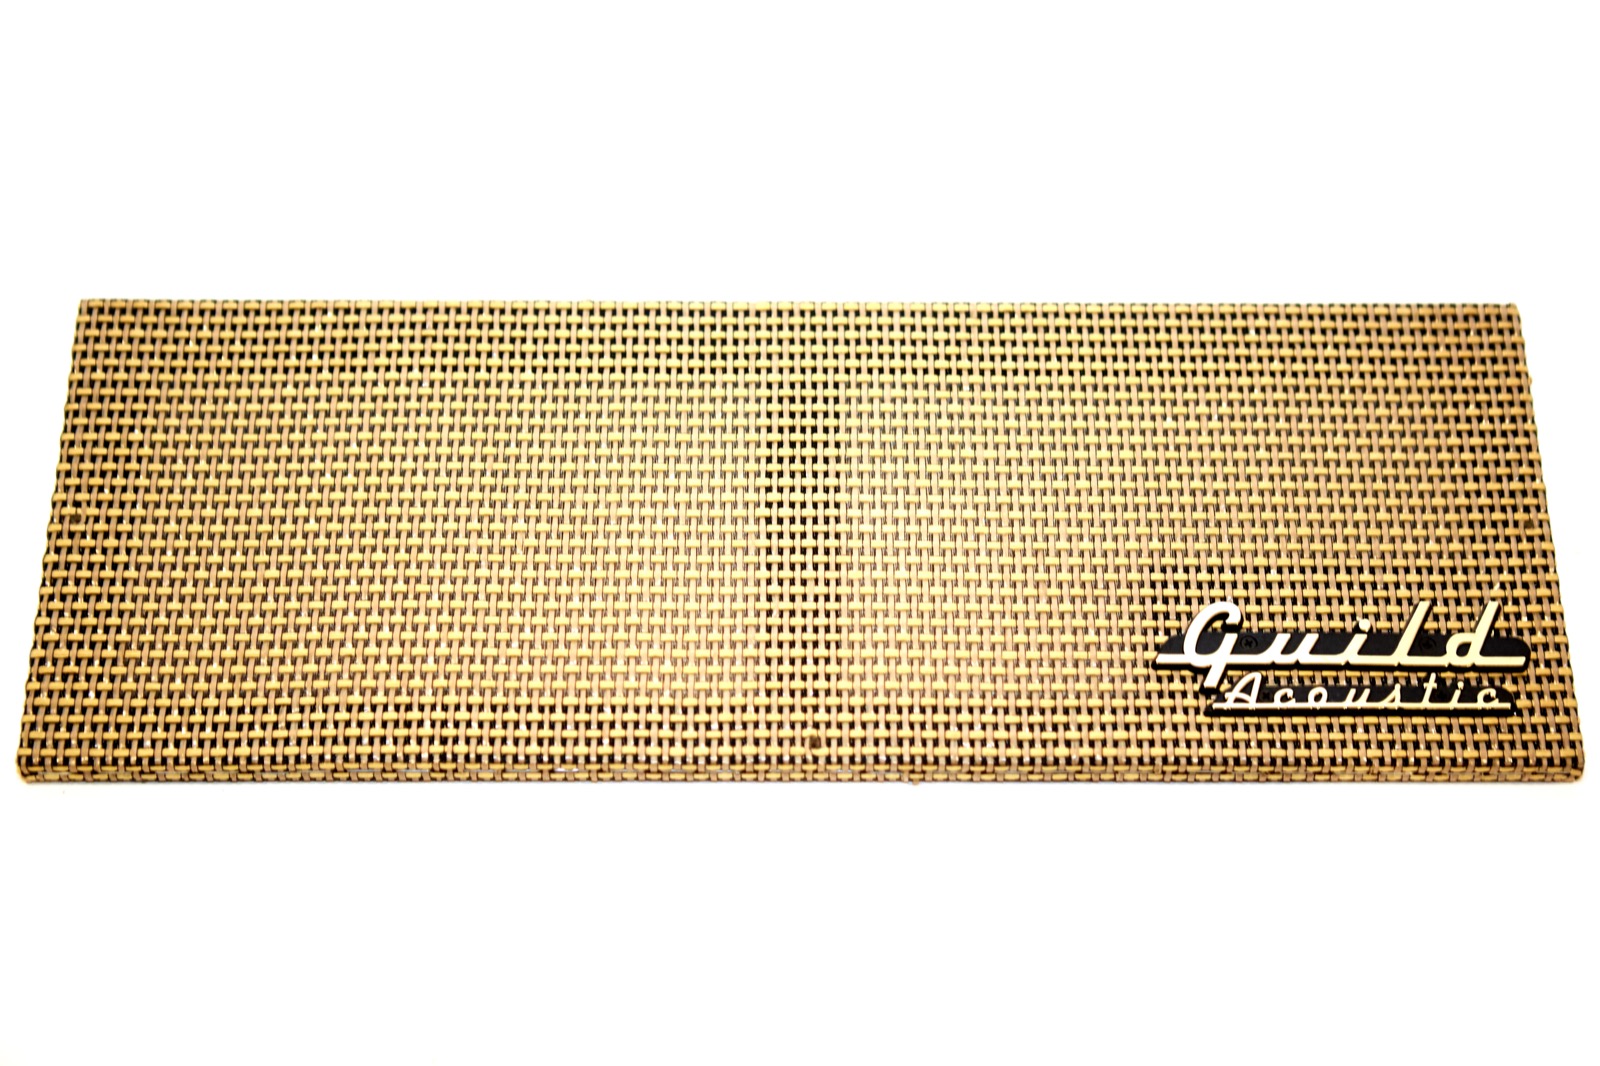
The grill is what I assume to be a cane weave. If mine were to tear I’d probably go right for the MojoTone cane weave to replace it because, though it’s not an exact match, the overall look is pretty similar. I might worry about sound coloring with the different cloth, but luckily I haven’t had to worry about that yet.
The logo on the front says Guild Acoustic in gold, and I wish you good luck ever replacing that if it breaks or gets lost. The grill on the G300 Tamarack is held on with three wood screws so the top tends to have some give, at least on the amp I have.
Controls
All of the controls and connections are on the front of this amp. Here they are in order from left to right as seen on the faceplate with a brief description for each:
Input
The input jack is where you plug in the guitar. I assume I didn’t really need to explain that but you never know and there is another jack on the amp that looks just like it and plugging your guitar into that one does have a desirable effect, so now you know.
Sensitivity
The sensitivity knob is only active when the Active/Passive switch is set to Passive and acts like the volume knob on an active pickup which is kind of what it is. Tip: if your guitar squeals when you turn this up, flick the Active/Passive switch to Active and stop using this knob.
Active/Passive (switch)
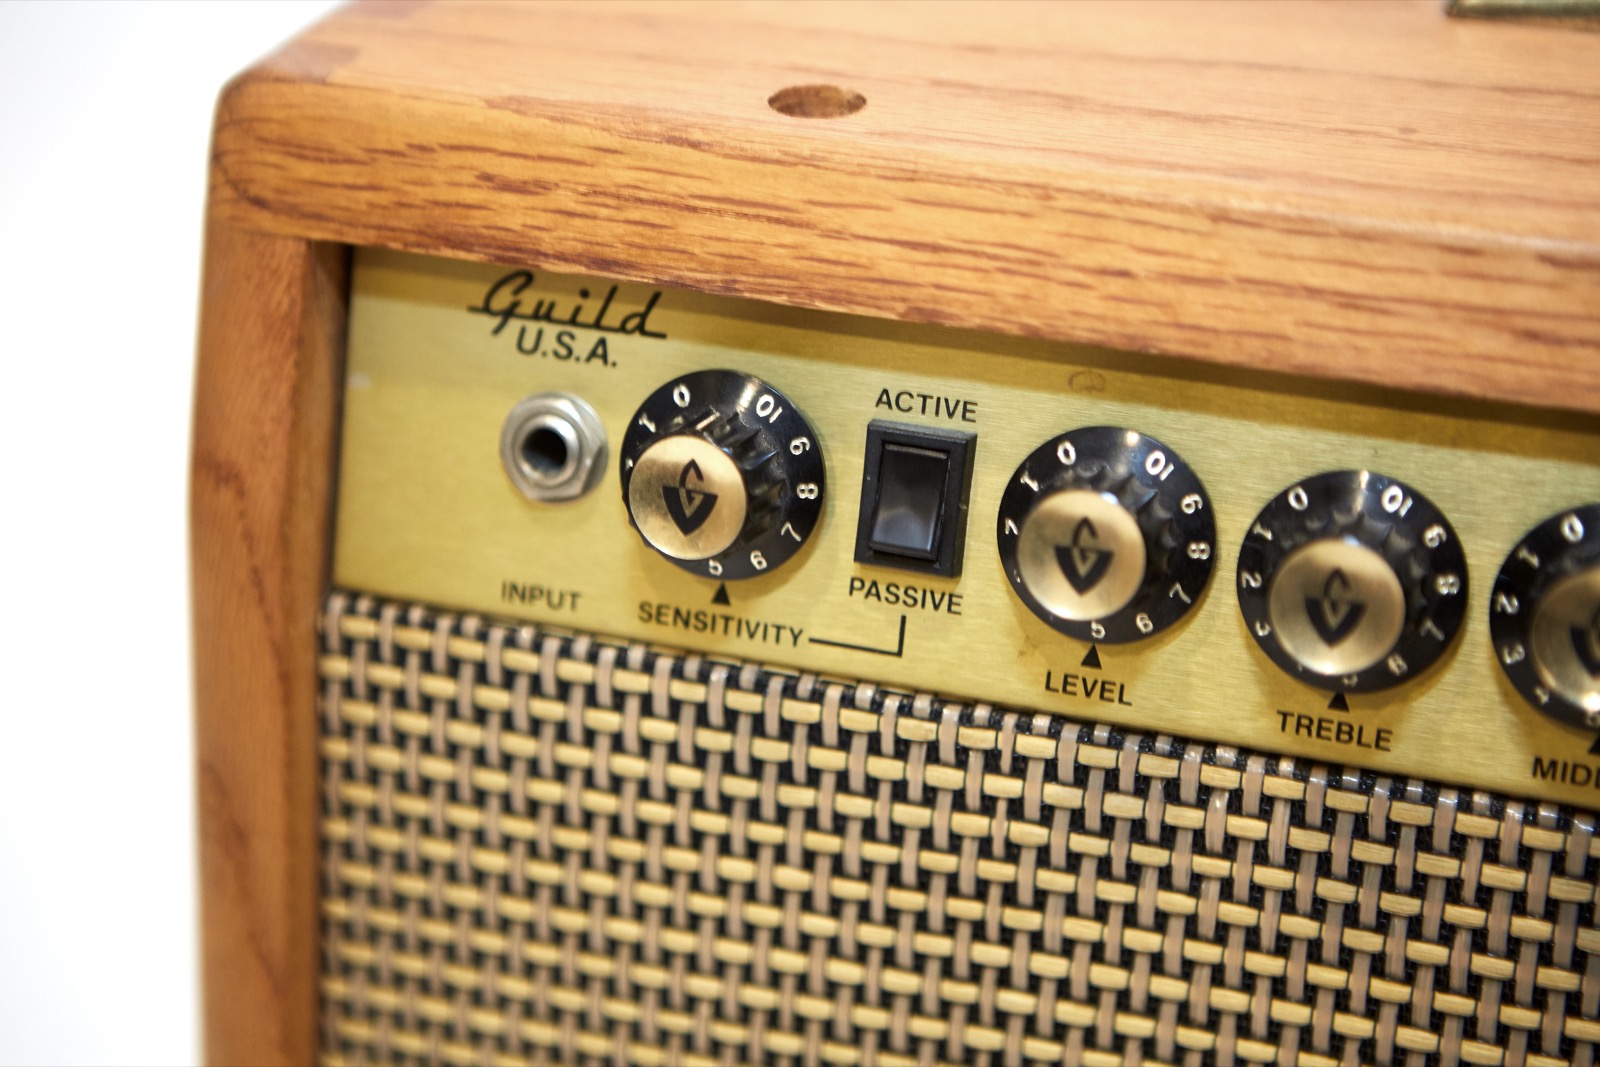 This enables a preamp when in Passive mode and disables it when in Active mode. I know, that seems backwards (there’s lots of weird stuff on this amp), but you set this based on what kind of pickup is in your guitar. If you’re guitar pickup doesn’t have a battery that means it doesn’t have a preamp and is therefor passive. Thus, you set this switch to Passive. If your pickup does have a battery, then it’s an active pickup and you set this to Active.
If you set this to Passive and you have an active pickup in your guitar then you’ll end up pre-amping your pre-amp and it will either a) sound really bad or b) squeal and feedback like crazy which depending on your tastes may or may not be the same as (a).
Level
The manual states that this sets the input level of the amplifier. Looking at the schematic, this control alters the gain of an opamp, so it’s like setting the volume of the preamp after the preamp that may or may not be engaged with the Active/Passive switch.
Treble, Middle, and Bass
These are the tone controls. This is an amplified stage (they all are, really), but not individually. In other words, the controls are not individually amplified, but rather the tone stack is as a whole. in other words, these are passive tone controls.
Plectron
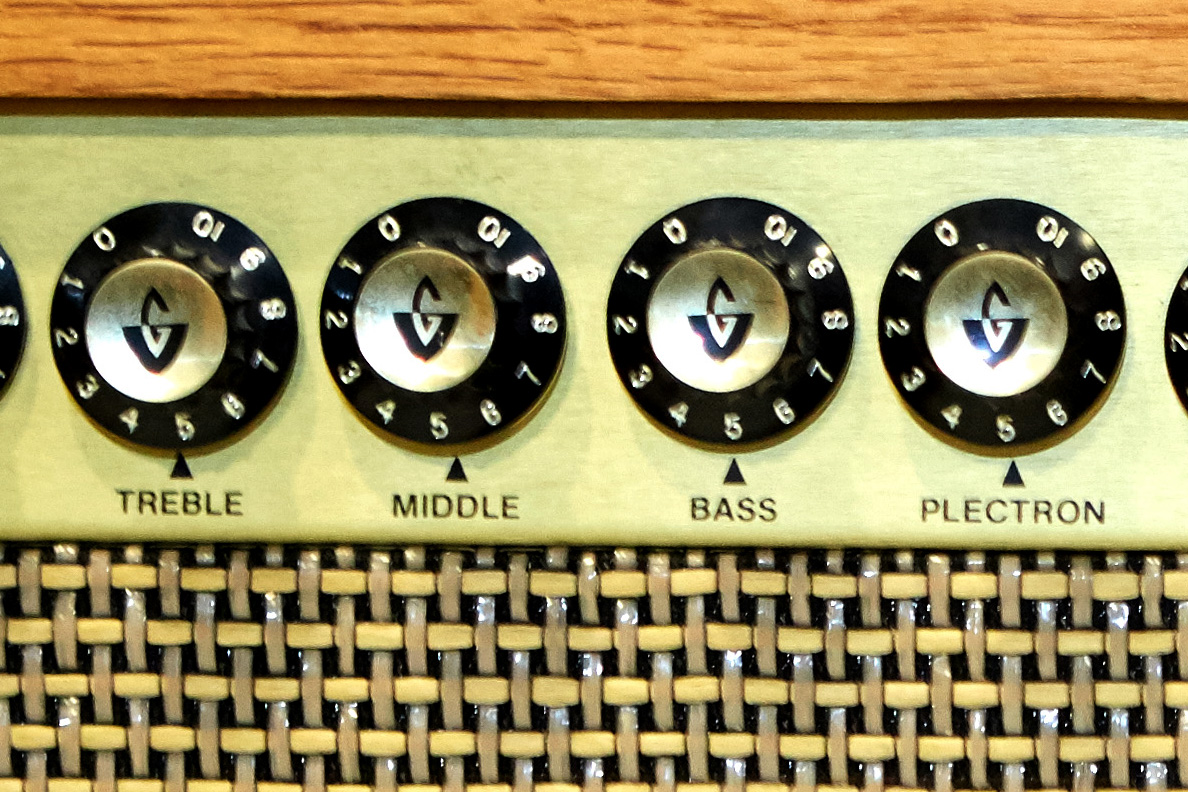 The manual describes this control as “An ultra high frequency tone control used to accentuate pick attack for flatpicking or fingerpicking styles, or can be used to smooth out pick attack for jazz or mellow styles.”
Looking at the schematic, the Plectron is a 2K linear pot with a .01 μF capacitor (similar to how the tone control in a guitar works). That doesn’t seem like magic. Hell, the treble control is a 50K linear pot connected to a .002 μF cap, so what’s the big deal?
This is a standalone control that’s later in the signal chain (near the master volume), and it looks to be a simple tone control but there’s some stuff going on in that part of the schematic that exceed my self-taught capability to understand. Therefore, it’s magic until someone convinces me otherwise.
Notch
The Notch filter is used to narrowly filter out frequencies in order to help prevent feedback. This dial controls the frequency that is being filtered out, and in theory if you’re having feedback issues, turn on the Notch filter and turn this knob until it stops. The Notch filter only sweeps between 100Hz and 1200Hz and should have a minimal affect on tone since the filter is so narrow.
In/Out
The In/Out switch enables or disables the Notch filter.
Reverb
This dial controls the amount of reverb added to the signal. To disable it just dial it down to zero (remember, there is no foot-switch on this amp). As with most tank-based reverbs, a little goes a long way and setting this too high can make the amp sound metallic and unpleasant in a “please turn the reverb down” kind of way.
Master Volume
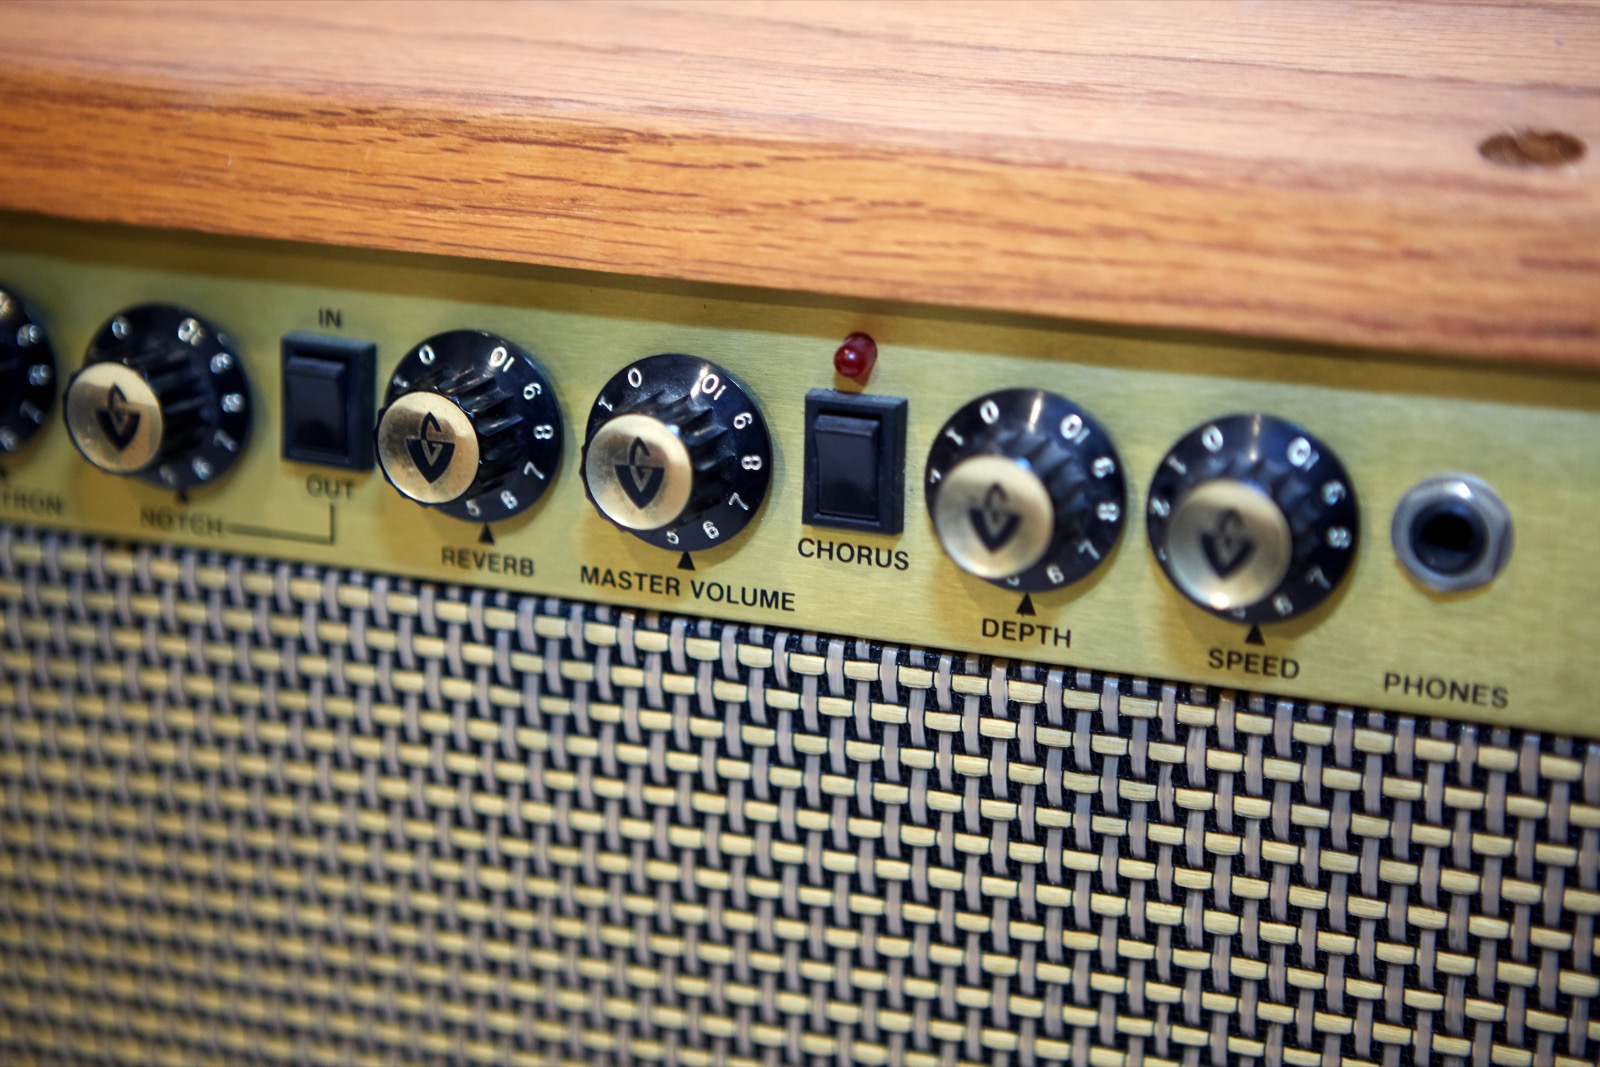 This is the control for the power amp section of the amplifier where you’re supposed to “control the overall volume level of the amplifier.” Since you don’t use the amp like a tube amp where you’d boost the preamp to distortion levels and lower the volume with the master, this can seem odd to electric guitarists. The fact remains that this knob is controlling the gain of the power amp and ends up being the control I use the most.
Chorus (switch)
This switch enables or disables the Chorus feature which is controlled with the Depth and Speed knobs.
Depth
The Depth knob controls the intensity of the Chorus and the “stereo enhancement effects”. From what I’ve seen playing with this amp, this effect can go from subtle to “OMG turn that off!” in very short order. A little chorus goes a long way, especially with this solid state Chorus from the early ’90s.
Speed
The Speed knob controls the speed of the Chorus effect as it wavers from side to side. This is another control where I tend to keep it down low because it quickly gets out of hand.
Phones
A stereo headphone jack that disables the main speakers when a 1/4″ phone plug is inserted. Try not to plug your guitar into this jack.
Power
Used to turn the damn thing off when your wife says it’s too loud at 11pm. You know, or the gig is over. Whatever.
Control Summary
 The controls are laid out in such a way as to be completely indecipherable when in use. I did most of my testing with a guitar on my knee sitting in front of the amp in a brightly lit room and I was constantly tipping the amp back in order to figure out which knob did what. Since all the knobs are the same and the labels for them are on the bottom, with the amp on the floor it is impossible to see what the knobs do unless you lie on the floor with your head even with the amp. Standing while playing is even worse, but of course at six feet tall I couldn’t reach those knobs, anyway.
I imagine that this amp would do alright on a table, but I’d try to make sure that it’s a sturdy wooden table because removing it from the floor takes away the floor coupling effect which may or may not be a good thing depending on your surroundings.
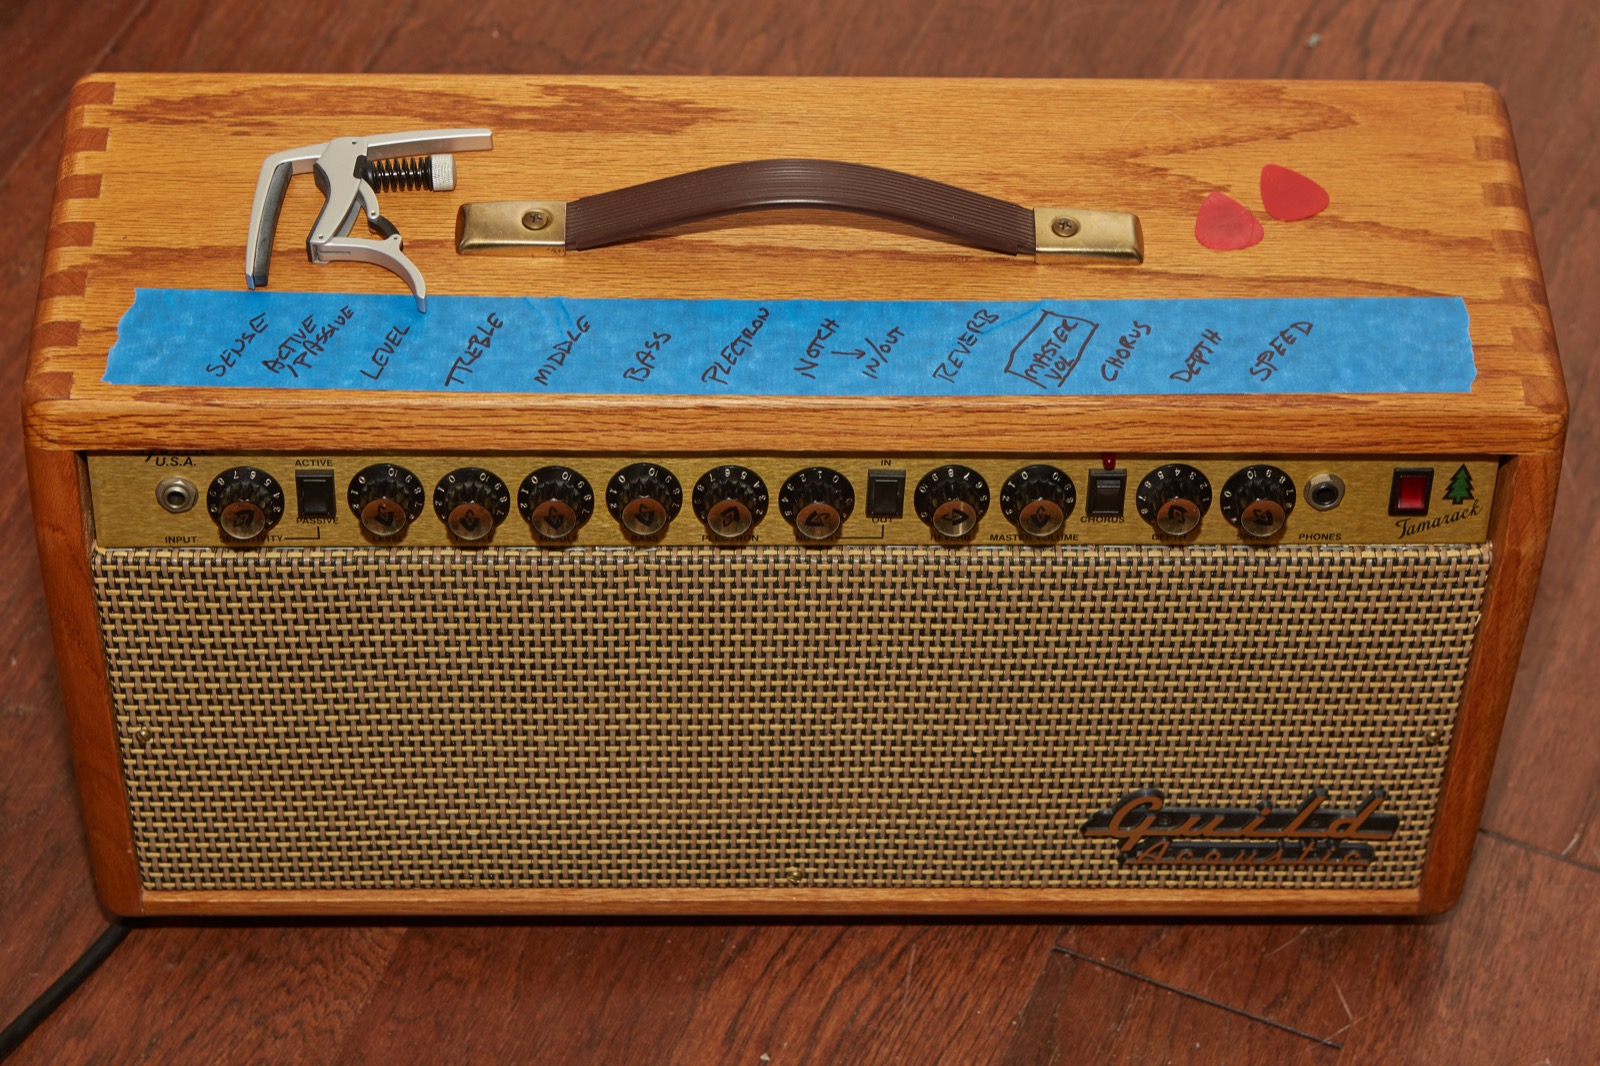 I also found the order of the knobs to be baffling. Since all the beautiful gold Guild knobs look the same and the damn labels are on the bottom of the knobs, finding the master volume (arguably the one knob you always want to find easily) was always a hassle. Why? Because it’s the third knob from the right and looks like it’s part of the Reverb settings. Dumb.
If I was gigging with this amp I’d probably end up with a strip of blue painter’s tape across the top with the names of each knob written on it which is exactly what I did while writing this review. Sadly, I wouldn’t leave the painters tape on there too long because the wood looks different around where the tape was when you peel it off. I saw this after only 24 hours using only painter’s tape so if you want to keep the wood looking nice you’re better off just memorizing the knob positions. A buddy of mine said that the amp is begging for some nice vintage looking engraved brass labels on the top. That might actually look pretty cool.
Electronics
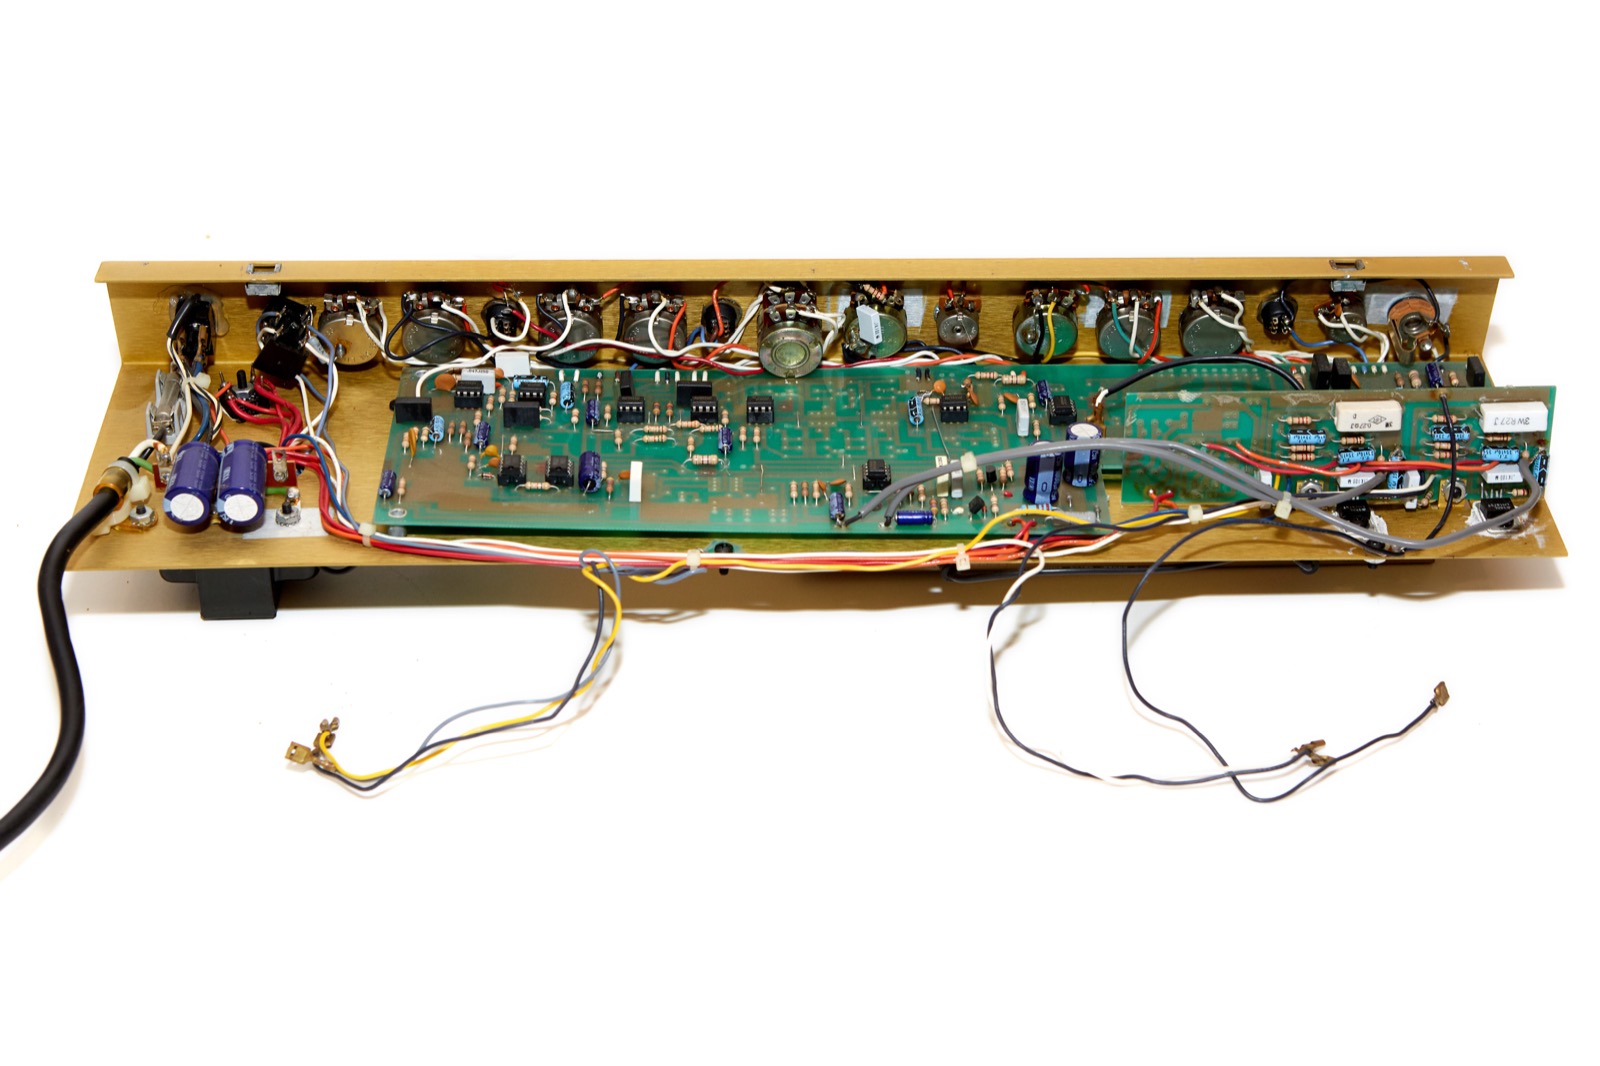 This is a solid state amplifier made by Randall for Guild. These were made early in the days of acoustic amplifiers and hold up relatively well to modern day alternatives though I think modern amps have better control layouts.
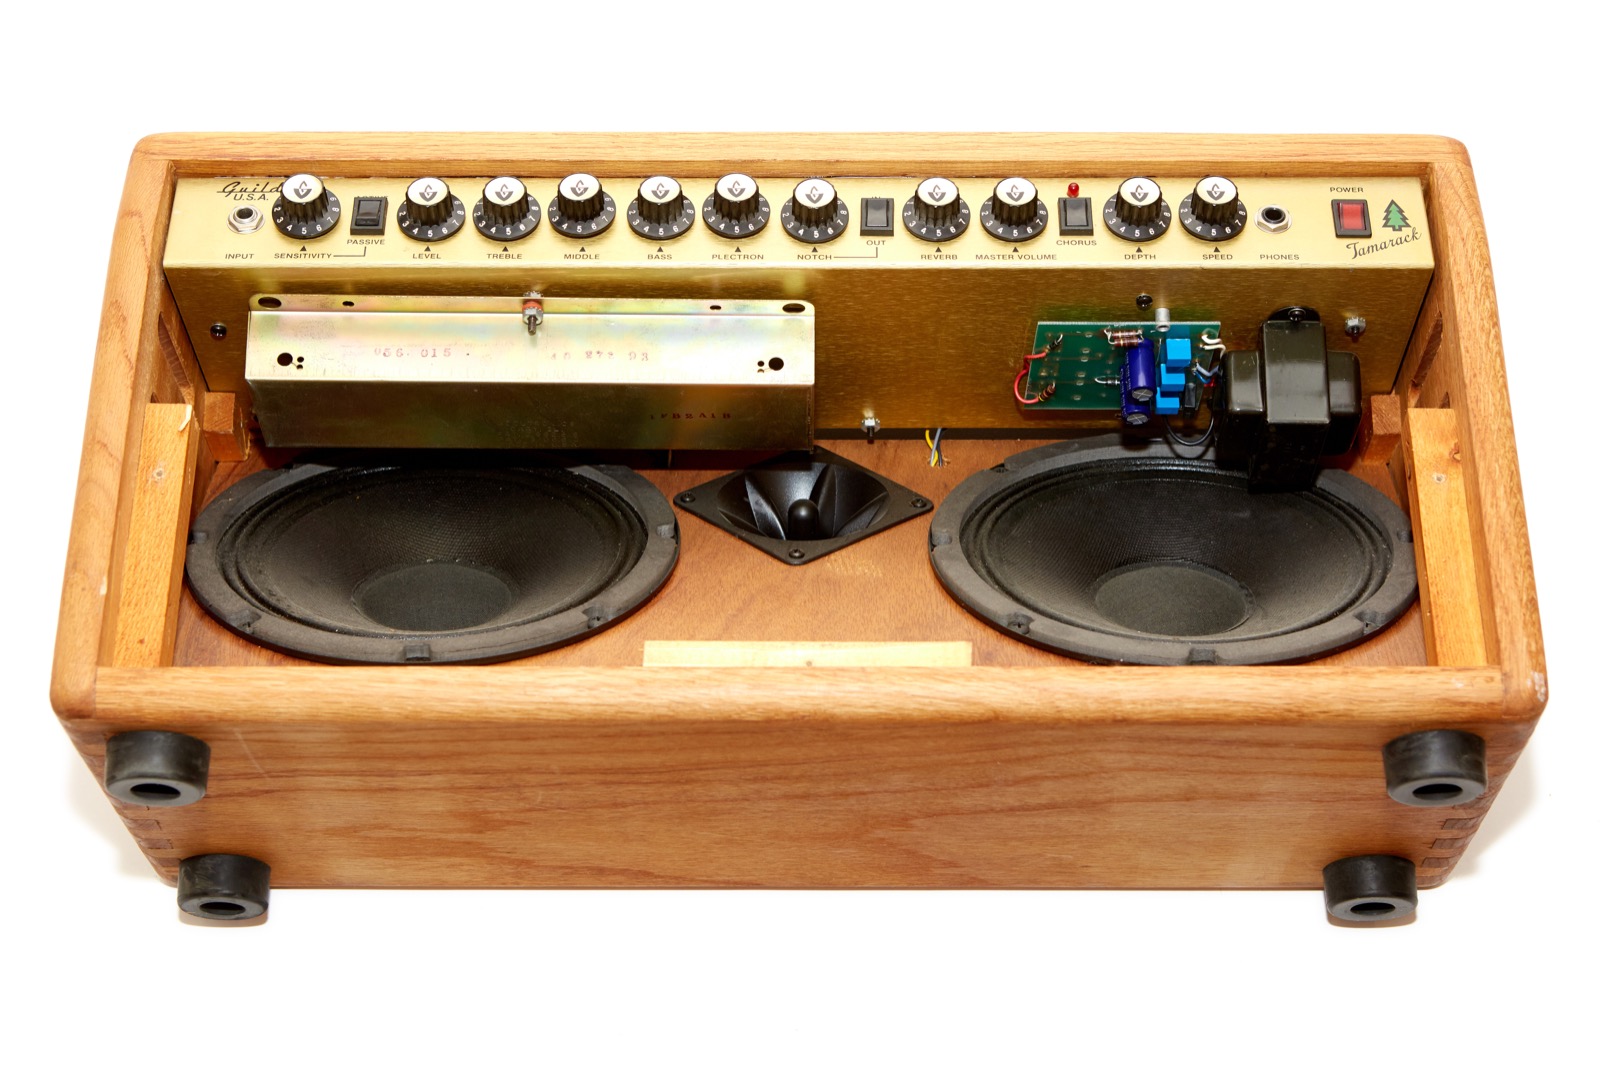
Included on the PCB mainboard are all of the features including the tone stack, notch filter, chorus, and so-on. Part of the power supply is on the back of the chassis, as is the reverb tank and power transformer. The power cord is a modern 3-prong plug that is not removable.
This is a stereo amplifier but it does not accept a stereo input. The amp attains stereo separation by splitting the signal for the chorus which then produces a left and a right signal which is sent to two identical power amps, each of which is rated at 20 watts and is driven by an LM1875T 20W monolithic audio power amplifier.
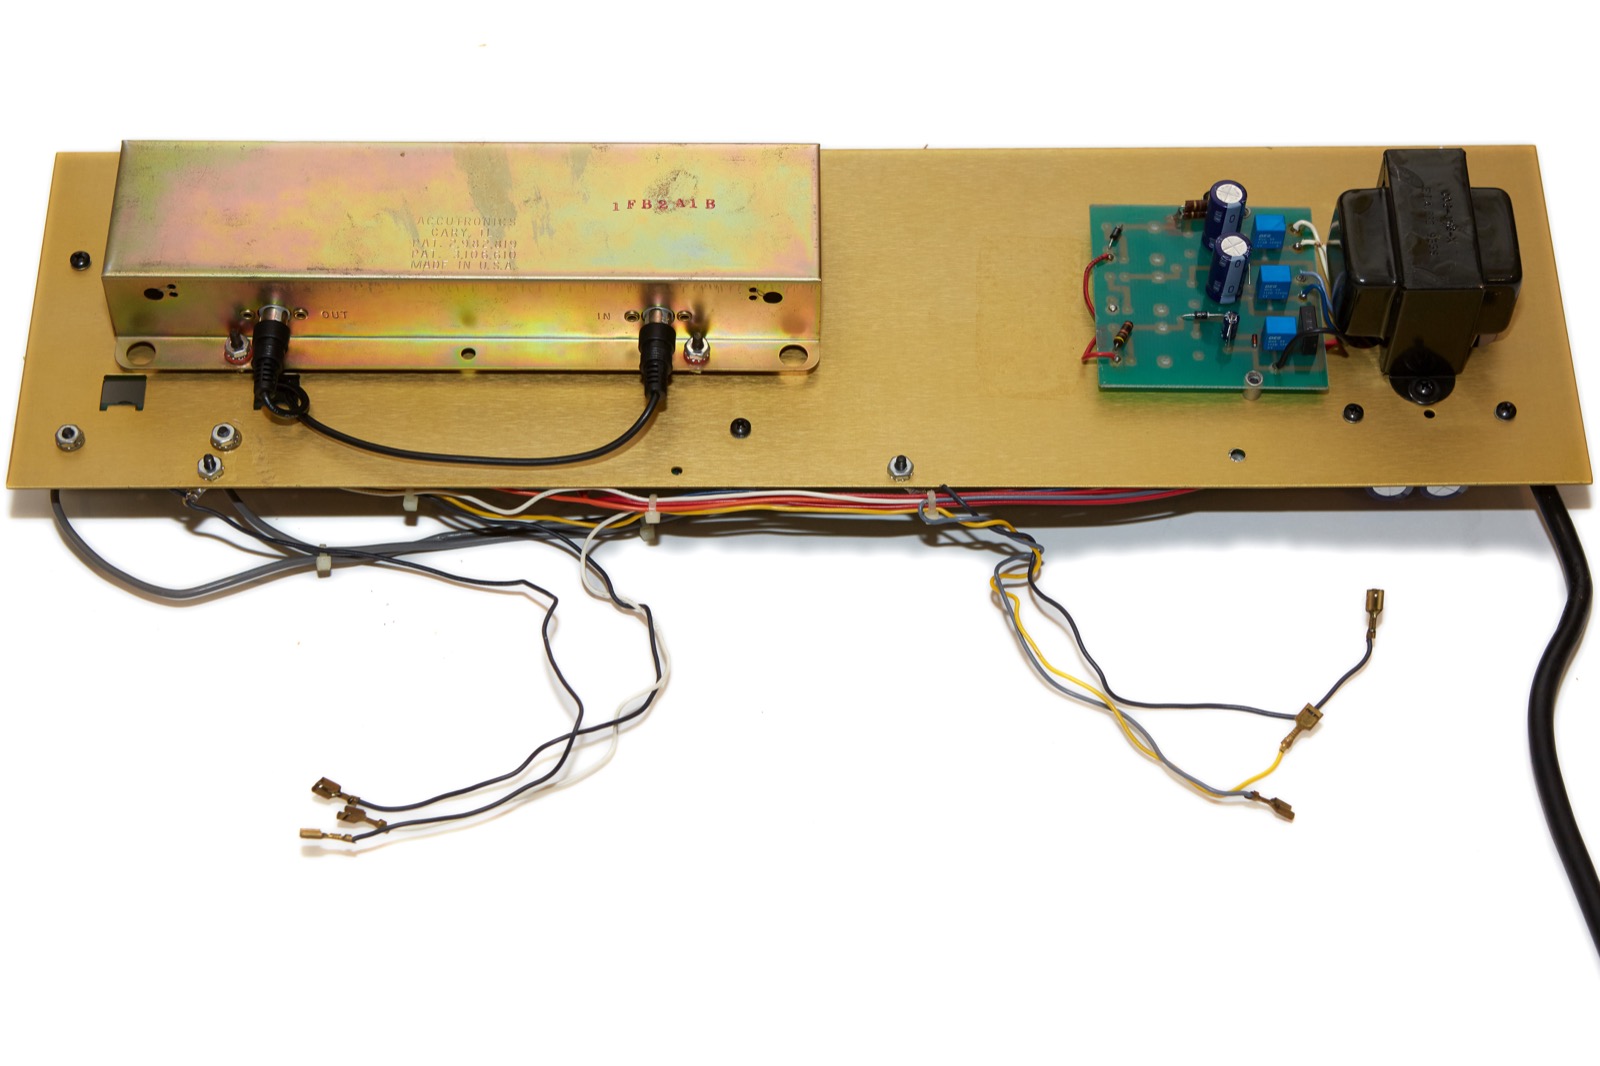 The reverb on this amplifier is provided by an actual reverb tank which made me happy since it’s rare to find a good-sounding digital reverb today let alone in 1992. The reverb tank on my G300 Tamarack is an Accutronics which also made me happy because I consider them to be the real deal. The tank is small, but given the limitation as seen with the power supply taking up room under the amp chassis, I don’t see how a larger tank could be fitted. Since the amp is so small, the speaker magnets almost touch the bottom of the cabinet so a tank cannot be mounted there, either.
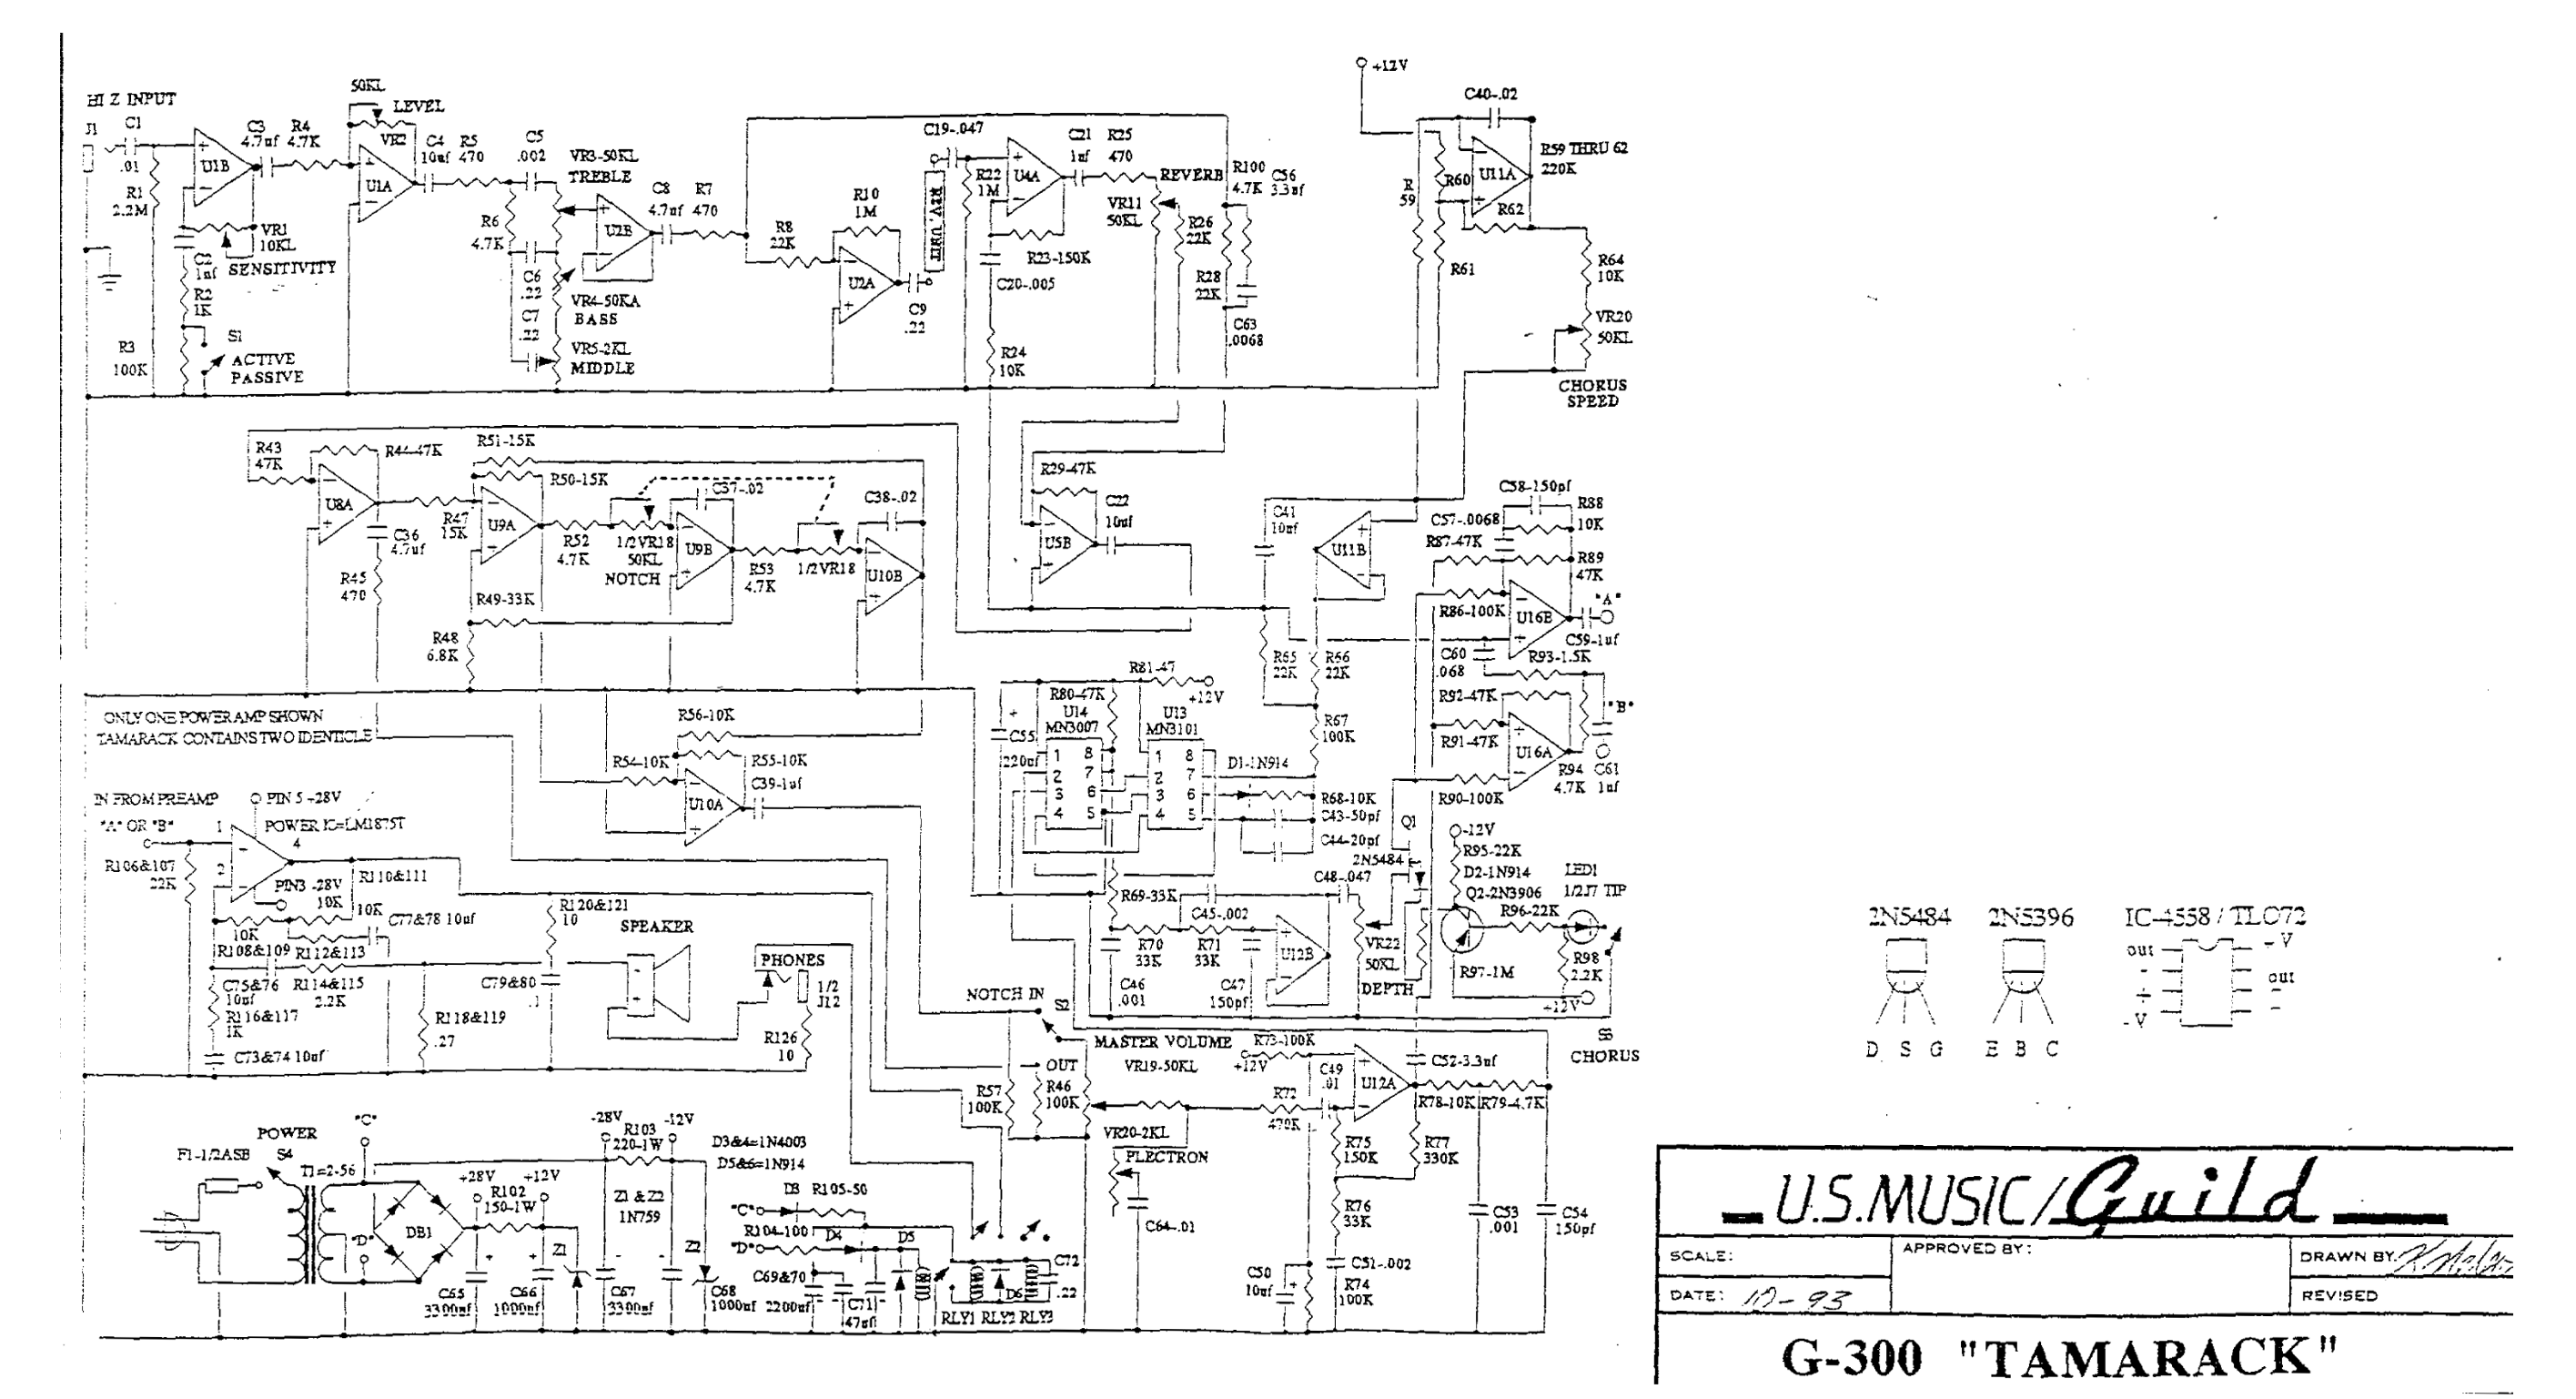 The schematic for the amp is available in PDF format from Randall here. I’ve also sourced it locally here. If you click on the pic of a piece of the schematic (see the tone stack?) to the right you’ll get a large upscaled PNG file I made of the schematic which I find much easier to read than the PDFs from the links.
By the way, if you’re not familiar with schematics those triangles are OpAmps , and the OpAmps on the board for each one of those triangle is a nifty little integrated circuit (IC) numbered as RC4558P. The reason I bring that up is because they serve a special place in guitar history and this amp is loaded with them. There are at least 10 of these RC4558Ps in my G300 Tamarack, if memory serves.
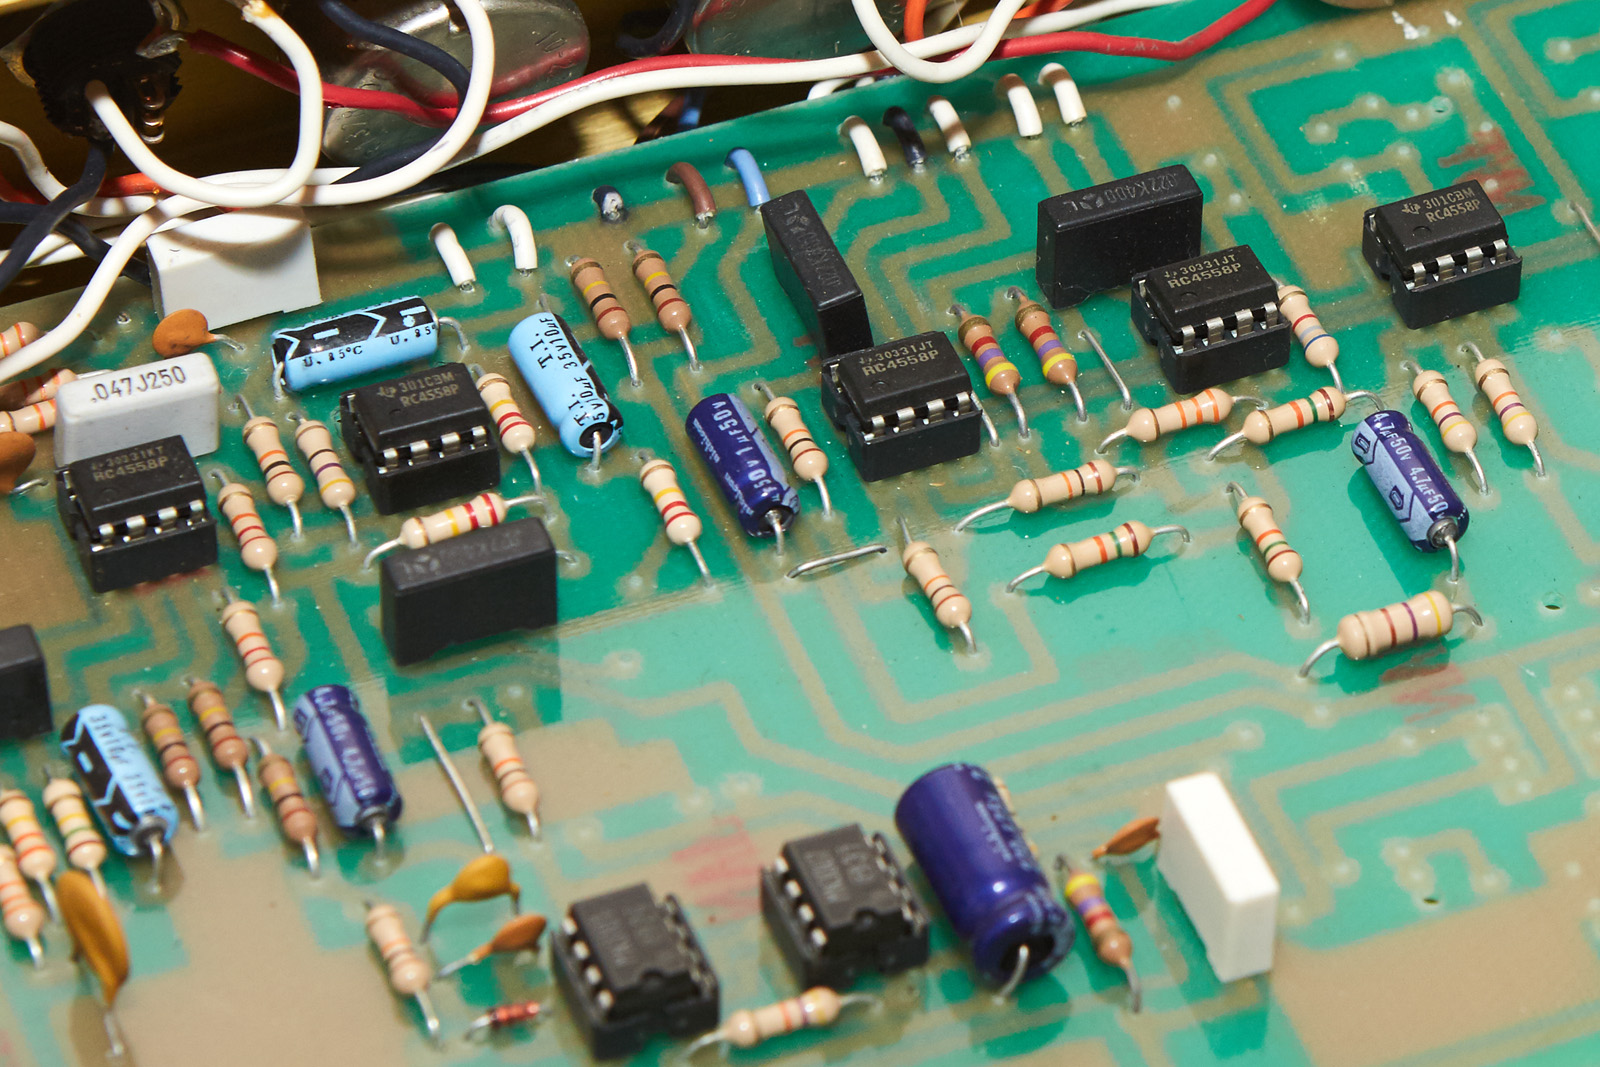 What’s the big deal? The Texas Instruments RC4558P happens to be the chip used in the famous Ibanez TS-808 Tube Screamer Pedal. Check out Analog Man’s page on Tube Screamer History for details and pics if you don’t believe me. They changed the chip later on to the JRC4558D which many people think isn’t as good so these vintage OpAmps tend to be desirable. Anyway, please don’t go buying up these rare amps thinking that you can yank all the chips and sell them to Tube Screamer Junkies because you can buy RC4558Ps by the thousands from Mouser, though many people will insist that only the vintage ones have that sweet vintage Tube Screamer tone.
One of the things I don’t like about the design of this amp is the fact that the power fuse is on the main board and is not accessible unless you remove the amp from the cabinet. That makes it a pain in the ass to replace at home, not to mention being all but impossible t accomplish at a coffee shop gig.
 The manual says that you shouldn’t remove the amp chassis because there are no user-servicable part inside. Well, except for the fuse which is user-serviceable by design. Sigh…
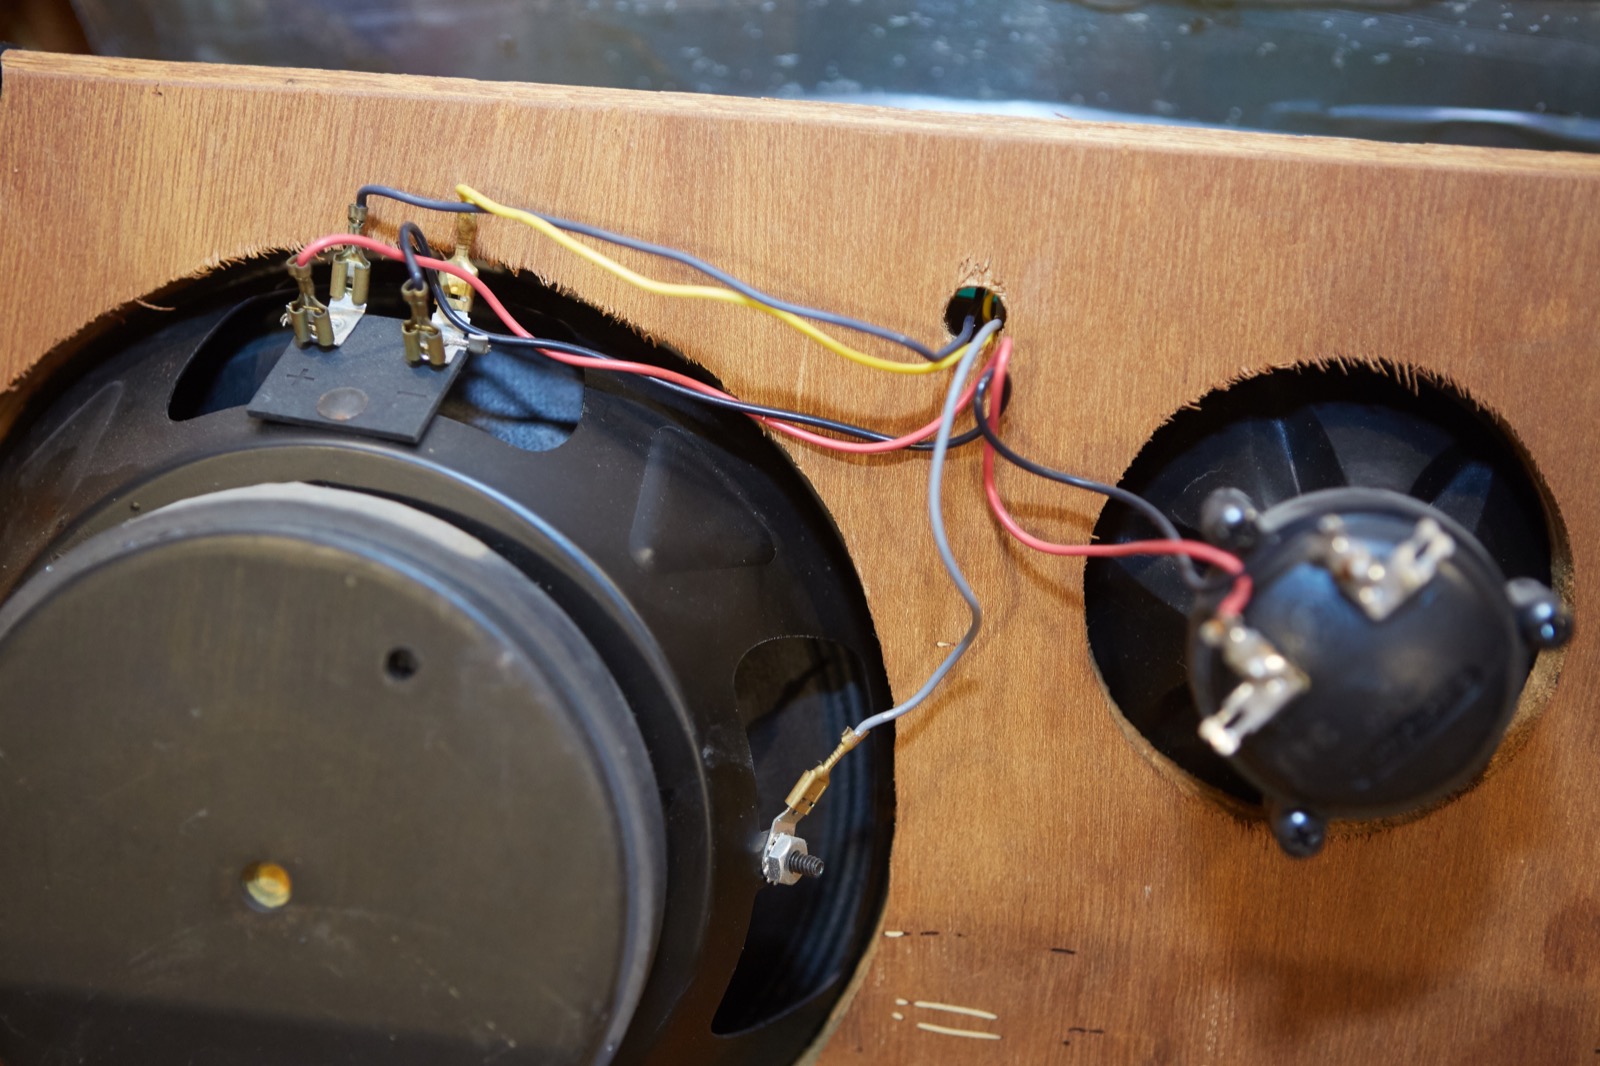
Anyway, be very careful of the speaker wires if you pull the amp chassis. These wires are kind of small and feed through two small holes in the back of the speaker baffle. If you’re not careful and pull out the chassis, you can end up yanking solder joints on one or more of the wires or pulling the amp terminals off of the speakers. It’s certainly not the greatest design, but this is the smallest and likely least expensive amp in the series and the larger amps all appear to have 1/4″ phone jacks for speaker connections the same way that an electric guitar combo amp does.
Speakers
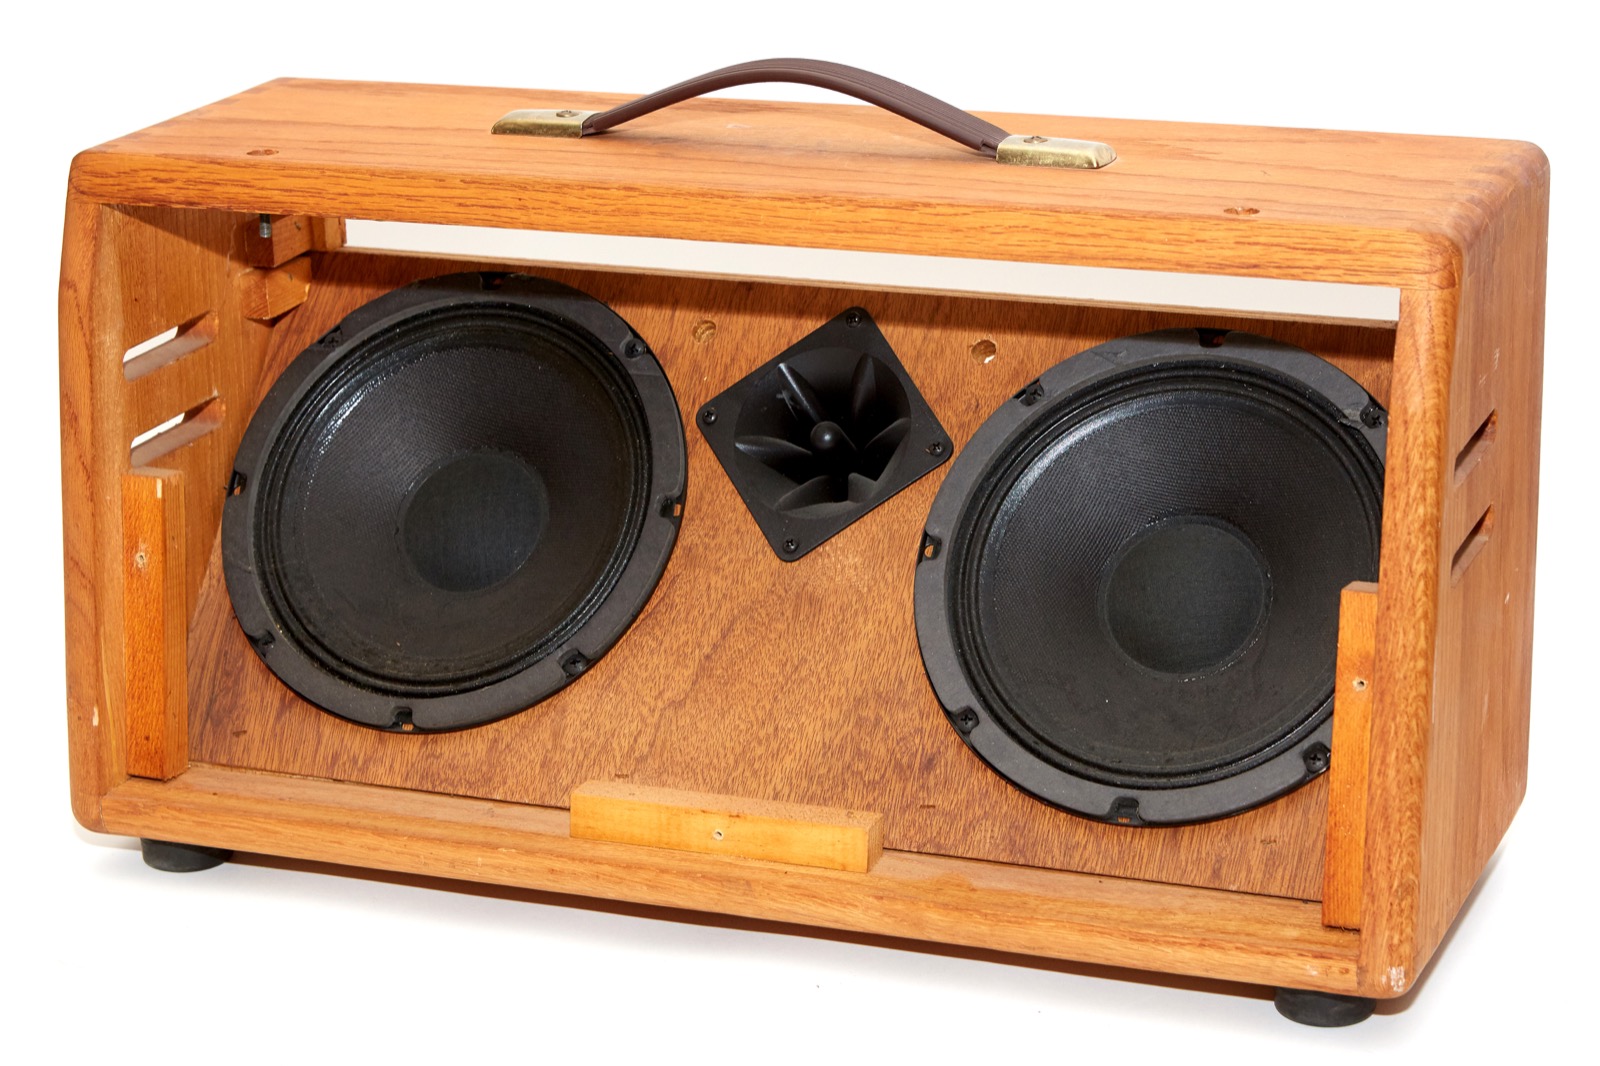 This small cabinet cleverly conceals two eight inch woofers and one piezo tweeter. The speakers are installed at an angle which keeps the size of the enclosure small. This also helps to project the sound upwards which is a nice touch since this amp may commonly be used on the floor where it would benefit from acoustic coupling for increased bass response.
The Speakers in this unit are labeled as follows:
8″ (R) – 8165 16Ω 67-93230055 G1
8″ (L) – 8165 16Ω 67-93230485 G1
Tweeter – Motorola 349
The Eminence codes break down As follows:
8165 – Customer part number
16Ω – Speaker impedance
67-93230055 – Eminence
67-93230055 – Made in 1993
67-93230055 – made in the 23rd week
67-93230055 – The 55th speaker made that week.
67-93230485 – The 485th speaker made that week.
G1 is an Eminence metal group number. I have no idea what that means but suspect is has to do with magnet types.
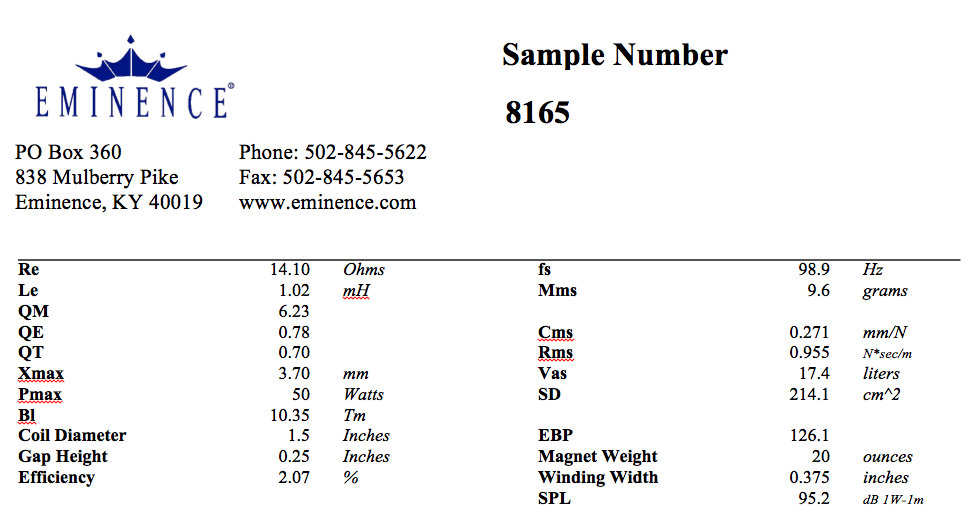 I emailed Eminence and was thrilled when they sent me the information to the right about these speakers since I was unable to find out anything about them from Hans (and that almost never happens!) or Randall (designers of the amplifier).
In short, these speakers are 50 watts RMS, 16 Ω (14.10 to be precise), and a bunch of other stuff that I don’t care too much about because I’m not a speaker engineer. Still, I imagine that’s damn-near everything you could want to know about these speakers if you wanted to make your own replacements from scratch.
 Eminence also informed me that they do not currently make a direct replacement for these speakers, so if you blow one you’ll have to audition some alternatives unless you’re a speaker engineer who can whip up a duplicate given the cool information provided above.
The tweeter is another challenge. Motorola stopped making piezo tweeters in the early 1990s, so this is probably among the last of its kind. CTS took over production of the tweeters and sold them as KSN 1005 Super Horns. CTS then sold the product line in 2005 or so to Piezo Source. Replacements can be bought from Piezo Source or US Speaker and the specs for the currently made unit are here. I have no idea if the new ones sound the same as the old ones.
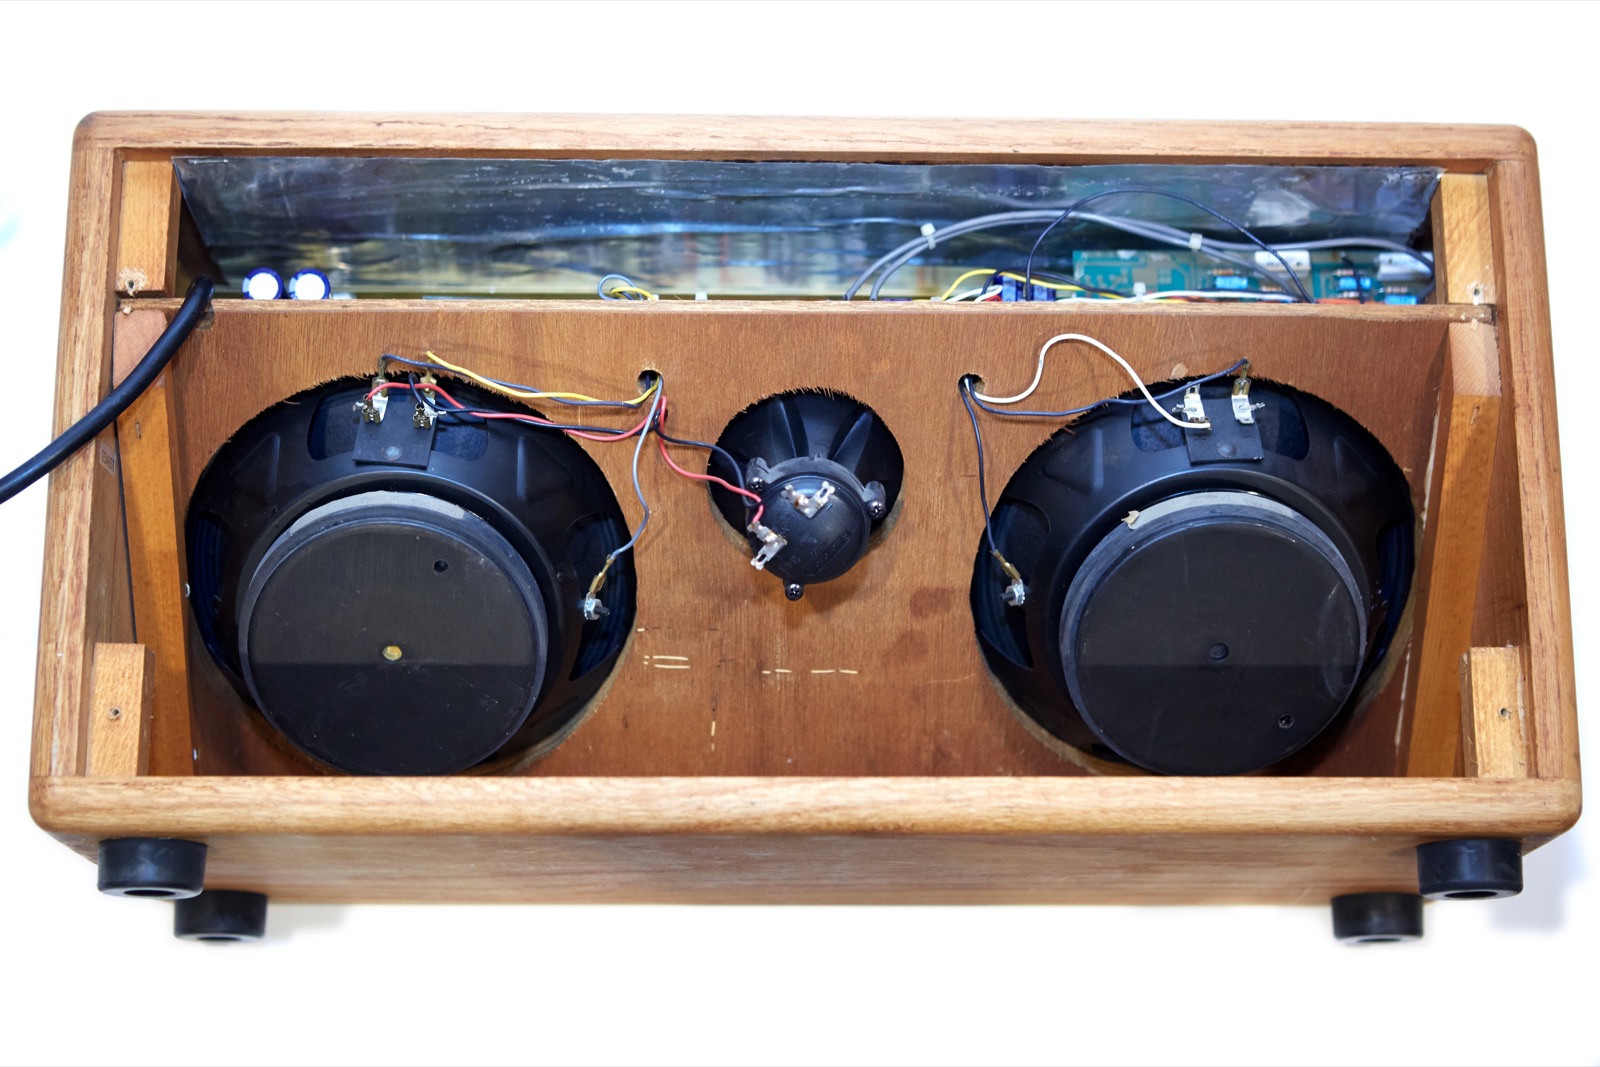 The piezo in this amp is simply wired in series with the right 8″ speaker (and thus only the right channel on this stereo amp). In other words, there is no crossover in the design. This was actually one of the selling points of these tweeters, though many people now feel that they behave better with a crossover in the mix and maintain that their use without crossovers is why piezo horns get a bad rap.
When I first started playing with the amp it hurt my ears and I was quick to blame the tweeter but judicious use of the front panel knobs managed to dial the harshness away. If you have one of these and you think it sounds harsh, make sure your Active/Passive is set right, try leveling out the tone stack (set them all to 5), and then try dialing down the Plectron setting.
Sound
 How’s it sound? That depends on your guitar, and that’s actually a good thing because an acoustic amplifier’s job is to reproduce the sound of the guitar without adding color or distortion. That’s why they tend to be solid state; all the nice distortion created by tube amps has no place in an acoustic amplifier. A good acoustic amplifier is a lot like a good PA system where you get the same sound, only louder. Of course all of that is true if the amp isn’t set poorly.
Given the ridiculous number of knobs on this little thing, I found it very easy to dial in some really bad tones, but once I got a handle on the many knobs, it’s really not all that complicated. Make sure the Active/Passive switch is right, set the tone controls to five, turn off the chorus and reverb and start from there.
All you Guild fans may be horrified, but I auditioned this amp with my Taylor DN-K. Why? Two reasons: first, it’s my favorite acoustic guitar and second, at the time of this review I did not have any Guild acoustics (gasp).
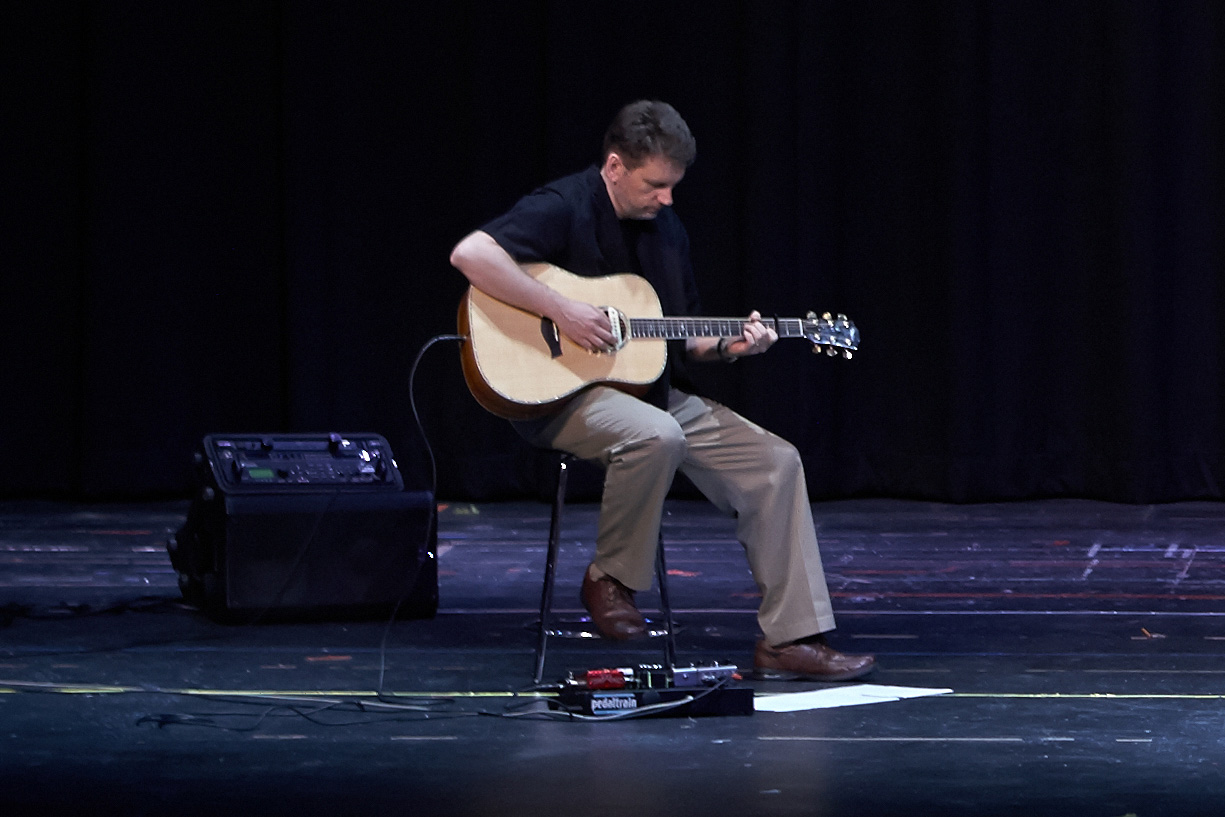 I love my Taylor because it’s brighter than a typical acoustic while also having a great clean low end due to the dreadnought size. This guitar has a very precise tone with great complex overtones that I just love. I rarely play acoustic in front of people and so its lack of electronics has never bothered me, but when I was asked to play at my daughter’s school, I bought an LR Baggs Mq active sound-hole pickup and used my QSC K12 and Axe-FX rig to supply pure clean power. It worked like a charm and sounded surprisingly good to my ears, but to be fair that’s a $700 1000 watt bi-amped two channel PA speaker that probably shouldn’t be compared to this little Guild G300. Then again, this little amp was purpose built for acoustic guitar while the K12 was designed to make quiet things louder with the flattest response possible.
My God
Hotel California
Plectron Test #1
Plectron Test #2
[/dropshadowbox]As usual, for these recordings I used my Olympus LS-10 sitting about 18″ from the amp at speaker level.The first recording is me playing the selection that I use to test any acoustic guitar I pick up: the introduction to the Jethro Tull song My God, from the album Aqualung. The guitar was tuned down a bit and I simply cannot remember why, but it does a good job showing the amp’s sound, especially compared with the other recordings.
The next test is me playing the intro to the Eagles song, Hotel California from the album of the same name. For this test I played with a capo on the 7th fret and had the chorus engaged as well as a bit of reverb. Maybe a bit too much of each.
The last two recordings are of me playing the same riffs while changing the Pleactron setting because one of the most common questions i see is, “what does the Plectron knob do?” Both Plectron recordings were done with all tone knobs on 5. Each example was recorded three times for each recording, once with the Plectron knob on 1, once on 5, and once on 10.The first recording is me fingerpicking while the last one is of strummed chords.
Note that both of the Plectron recordings have a 60-cycle hum evident, and I’m not sure why. Until I can isolate that to the amp or the environment, I’m leaving it and will update this post if and when I resolve the issue, but since it’s not evident in the first two recordings, I think it must be environmental.
Lastly, it is important to remember that this amp does something very well, which is to cleanly amplify an acoustic guitar. With all the tone knobs on five I was quite pleased with the tone I was getting and was able to dial it in a bit more to make the character of my Taylor shine through. The reverb works well in moderation and the Plectron actually seems to perform as advertised, though it can be a bit weird because it kind of behaves like a subtle tone control.
Conclusion
I like this little amp and I’m glad I bought it. At the very least it looks great and is a very cool piece of Guild history. I like the way it sounds, though it’s quite easy to dial in some harsh tones and I think I’d probably opt for a modern chorus pedal instead of using the one built into this amp.
The knob layout is confounding, the labels are impossible to read unless the amp is on a stand (but remember that the speakers are tilted up inside the cabinet) and it’s not very powerful, but it’s still a very cool little amp that I would absolutely use for small venues or gigs. For larger requirements I’d probably rather have the larger Guild Aspen G600. In fact, I think I’ll go buy one of those to review next.
Donate: PayPal Crypto:
ETH: 0x0AC57f8e0A49dc06Ed4f7926d169342ec4FCd461
Doge: DFWpLqMr6QF67t4wRzvTtNd8UDwjGTQBGs
Thank you very much for your detailed review and for sharing all the information you have gathered regarding the Guild G300 Tamarack acoustic amp. I picked up mine about 15 years ago from a seller on Craigslist (with the brown leather dust cover and a hardcopy of the user’s manual), but I’m extremely pleased — as a result of finding your review here — to learn more about its history and especially to have the electrical schematic. The 60Hz hum in your Plectron Test recordings is a “feature” of my G300 also, unfortunately … so naturally I’ll be interested to find out if you are successful identifying its cause and/or how to eliminate it. With schematic in hand, I might feel more comfortable taking mine in for service — something I’ve been avoiding not knowing how unusual/unique or commonplace the electronics circuitry was, fearing that in the wrong hands absent any electrical schematic, an uninformed attempt at a cure could end up being worse than the present ailment. Additionally, being aware now of the Randall connection, it might not be a bad idea to investigate where in my area to find Randall authorized service for it. Thanks again.