 I’ve owned many Guild guitars, and due to the fact that I have a soldering iron and I’m not afraid to use it, I’ve learned a fair bit about various Guild pickups and their wiring. Since there seems to be little information on the Internet about this topic, I decided to write up what I have discovered.
Though I’ve covered the cosmetic and size differences of the various full-sized Guild HB1 pickups in my article entitled Guild Full-Sized HB1 and SD1 Pickup Variations, this article will cover the wiring of the pickups as opposed to the means of identifying them.
There are many different Guild guitars, and there are almost as many wiring schemes. Instead of covering each scheme here, I’ll describe the pickups themselves, and how they might be wired into any guitar. Other articles, such as The Fascinating Guild S-200 Thunderbird and Replacing Pickups in a Guild Nightbird will cover wiring specific to those guitars.
Pickup Terms
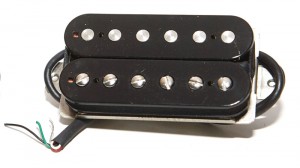 Pickups are comprised of one or more coils of very thin magnet wire. A humbucker pickup has two coils, usually arranged in such a way as to cancel (or buck) the 60-cycle hum commonly encountered when using AC power. I won’t go into the detail of why this works because it’s worthy of an article unto itself. If you’d like to know more, this link provides an excellent explanation.
Typically, one coil will have screws and the other will have slugs. In this picture, the top coil has slugs while the bottom coil has screws. The screws are there to allow high adjustment to balance the energy picked up (hence, pickup) from different strings. I will refer to these two coils as the slug coil and the screw coil, respectively. Note that on a humbucker with a metal cover, you cannot usually see the slugs.
Notice the colored wires on the pickup. The meanings of the colors changes based on the manufacturer, which can be maddening. As we’ll see, different iterations of Guild pickups have different colored wires as well, so as you can see this is a very common problem.
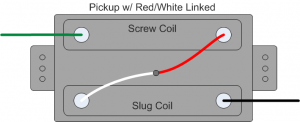 In a nutshell, the colors correspond to their position in the pickup. The screw coil will have a start and an end, and the slug coil will have a start and an end as well. On old pickups like the Gibson PAF, there was only a single lead with a ground wire. In these pickups, the end of one coil was internally wired to the start of the next. Since all circuits seek ground, the end of the double coil arrangement was attached to ground while the beginning was the lead. The pickup above simulates this arrangement by twisting the red and white wires together. If we tied the black lead to ground (or green depending on the pickup), then a single lead with a ground wire would be sufficient to connect the pickup.
The benefit of exposing all of the wires is that the pickups can be split into single coils, have their phase changed by reversing the wiring of one of the coils, and so-on.
1970’s – Mid 1980’s Guild HB1s
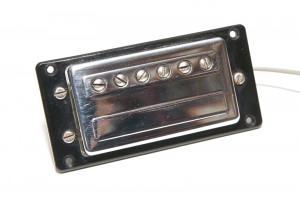 These are what I like to call Guild HB1s (as opposed to Fender HB1s). Having grown up in the 1970’s and 1980’s, these were the pickups that were encountered in humbucker-equipped Guilds unless they came with Seymour Duncan pickups, which was a popular option at the time.
These pickups are fairly unique in that they have a small board on them with two solder terminals. This brilliant idea allows the replacement of the pickup(s) without having to cut or replace the wiring, which can be a very big deal on semi-hollow guitars like the Guild Starfires. It is also fairly common to buy used pickups where someone has cut the leads to the pickup so short as to be unusable. With solder terminals on the pickup itself, this issue is negated as there are no leads to trim.
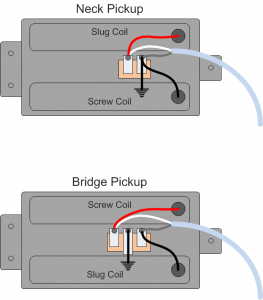 These pickups come in two flavors, generally described as bridge and neck pickups, though there is nothing preventing either pickup from being installed in either position. Note that the wires may both come from one hole as well as from two as shown.
These pickups only expose two wires, usually red and black (I’ve seen black/black, too), both of which are soldered to the small board on the back of the pickup. From what I’ve seen, the black wire is usually grounded on the outside lug and the red wire is usually attached to the inside lug. Wiring these backwards would only be an issue should you wire the other pickup in the wrong phase, which without a phase switch, would produce a nasally tone with both pickups selected. Note that the older mini-humbuckers or mini-hums are often seen with the wires reversed from what I’ve shown here.
The neck pickup has only two connections on this board, while the bridge pickup usually has three. Technically, both have only two signal leads, but the bridge pickup has the capability of separating both leads from ground where the neck pickup grounds one lead.
This arrangement on the bridge pickup allows for the inclusion of a phase switch, which was a common feature on Guild electrics in the 1970s such as the S-100, S-300, and Bluesbird. The way this worked was through a simple flipping of the wires so that the phase of the signal through the bridge pickup would be reversed relative to the neck pickup, thus causing the nasally sort of Peter Greene tone that everyone was chasing at the time.
Note that without a phase switch in the path, the bridge pickup behaves in the same way as the neck pickup. For example some Bluesbirds did not have a phase switch while using the same pickups.
Mid 1990’s Guild HB1s
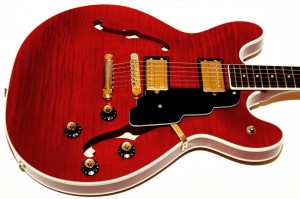
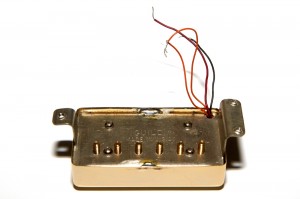 I used to own a 1994 Guild Starfire 4 (Pictured at the top of this article) that had HB1s that I’d never seen before. Hans Moust, author of the Guild Guitar Book informed me that they were HB1s, which explained why the guitar sounded as great as it looked.
Mid-90s HB1s look just like the 1970’s models on the front, and they have the same dimensions of the earlier HB1s, but they look slightly different on the back, due mostly to the fact that Guild abandoned the cool solder terminals. While the pickups do have leads, they are very short. Unlike most modern pickups that often come with multiple feet of lead, these pickups include about two inches of fragile, thin, insulated, pickup connection wire. Guild simply soldered these leads to a multi-conductor cable which was then soldered on the other end to the pots and switches according to the circuit specs.
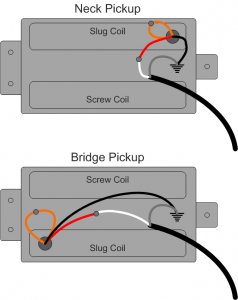 Additionally, these pickups have four wires: Black, Red, Orange and Orange. The black and red wires are the same as the black and red wires on earlier HB1s, while the orange wires are the inter-coil link. In my Starfire these orange wires were always linked together which makes sense since that guitar had no coil-splitting capability. The image to the right shows the wiring from my 1994 Starfire 4. You may see an additional black wire soldered to the back of the bridge pickup which is the ground wire for the bridge.
These pickups are wired just like modern pickups. The challenge is figuring out the phase when wired since the two orange leads offer no indication of which coil they might be connected to.
Seymour Duncan SD1s
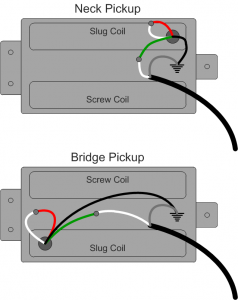 Seymour Duncan SD-1s look very much like the mid-90s HB1s, but they have different colored wires and labels to identify them.
These pickups are slightly easier to wire in complex scenarios because they have color-coded leads. Where the mid-90s HB1s had two orange leads, the SD1s have white and red leads, which in this picture are soldered together since this pickup was installed in a Starfire that had no coil-splitting capability or phase switch.
Additionally, where red and black were used for the primary leads on the HB1s, these pickups use green and black as the primary leads. This can cause some confusion, so make sure you’ve mapped out your leads before you start soldering.
Look carefully at this drawing and you’ll see that it’s exactly the same as the mid-90s HB1 drawing with the exception of the colors. Since there is color-overlap between the two models and they look so similar, be extra careful when working with these pickups.
Fender HB1s
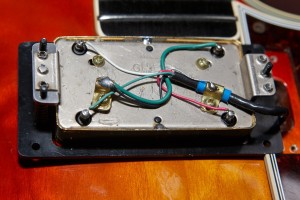 I’ve often maligned the Fender HB1s as being lifeless and boring, but that’s really only in relationship to great pickups like the original HB1s. The pickups are perfectly capable of producing great tones, especially for someone who’s fingers just ooze tone no mater what they play.
At first glance, these pickups seem like an ugly mess on the back, but the design is actually pretty cool. Instead of leads, the end of each coil has a soldering post that protrudes from the back of the pickup. This has the great benefit of being able to visually determine not only which coil you’re connecting to, but which position on which coil. Furthermore, the “start” and “finish” of each coil in this arrangement is left largely up to the person holding the soldering iron. It also allows for all the flexibility of the 4-wire arrangement without the risk of trimming the leads too short since there are no visible leads to cut!
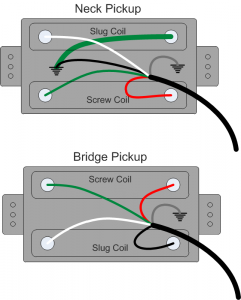 Wiring these can be a bit confusing if you’re used to other pickups, but they really just look different. The wiring diagram to the right is taken from a Guild Nightbird with Fender HB1 pickups. This is a cool example because this guitar has a phase switch and a coil-split option, which makes for some fancy wiring. In fact, I was working on replacing these pickups with some Mid-90s HB1s which is what led me to write this article, since there were so many options and I needed to document everything so that I could hook it all up properly.
These look complicated, but if you remember that the white/red wires are the inter-coil links, that the green/black are the primary leads, and finally that (in the case of the neck pickup) black is shunted to ground where it would end up anyway, then it’s not really all that complicated.
Look for more detail about how I replaced the Fender HB1s in this Nightbird in an soon-to-be-released article entitled Replacing Pickups in a Guild Nightbird.
Happy soldering!
Donate: PayPal Crypto:
ETH: 0x0AC57f8e0A49dc06Ed4f7926d169342ec4FCd461
Doge: DFWpLqMr6QF67t4wRzvTtNd8UDwjGTQBGs
Hi gad, sorry to bother you but i’m new to Guild s-100 (i just bought a 94 reissue and turned out to be one of the best guitars i ever tried, better than gibsons, fenders and almost any of my nearly 30 guitars).
I registered at letstalkguild but for some reason i can’t post, i contacted the administrators about it but received no replied yet.
The thing is that eeven being a terrific guitar, mine has some strange electrical features.
As i mentioned, it is a 94 reissue (fb000124) it has the old guild pick up covers, the rounded fretboard, the guild bridge instead of the tuneomatic and it would be a true guild if not because of the (i think) sd1 under the covers.
What’s strange about it is that when i have the pick up selector switch in the bridge position, with all the pots open, and i roll the volume bridge to zero, i get the sound of the neck pick up. And the other way around, if the switch is at the neck position and i roll down the neck volume completely i still get the bridge pick up sound. In both cases at lets say, 20%.
The other thing is that i get some microphonic kind of feedback when using the guitar at hi gain settings.
To complete the picture, i think that the overall sound is maybe kind of hollow, not bad, but it seems to me it could be fuller specially on a mahogany instrument.
My s-100 has the phase switch and i get not much diference out of it at hi gain but it becomes noticeable with clean tones.
Any ideas about what could be happening?
Once again, sorry to bother you but as i said before i can’t post at the letstalkguild site and for sone reason information on guild guitars is extremely rare at the web, even at the guild site.
Thank you so much!
Yompi from Argentina
I see your question has been approved on LTG and I’ve answered there. Link: https://letstalkguild.com/ltg/showthread.php?191444-1994-s-100-reissue
I have a polara NS that is fantastic. I would like to coil split both pick-ups. (Also possibly replacing the bridge pick-up tone with a rotory multifunction switch would really be cool to!) There just isn’t enough info about HB-1 modding.
Can you tell/show me the pick-up wire schematic for Newark Street Polara? I would like to coil tap/polarity. Thanks
The pickups on the Newark Street guitars are not able to be coil split without alteration to the pickup itself. You need a 4-wire pickup for coil splitting.
Polarity (phase, really) is just a matter of inverting the two wires via a mini-toggle or push-pull. Since most of the Polaras I’ve seen have quick-disconnects on the pickups, you’ll have to cut those off to wire to a switch.
Thank you for the fast reply. Now that I look at the picture with the little board on the back, the pickup just has the ground and the hot coming out going to the board apparently. I was really wanting to coil split these pickups. I guess I’ll just do the phase switch. On YouTube I can’t find anything about people modding Guild polaras. It’s either a secret society LOL or it’s just not that popular of a guitar. I’ve had this guitar for months and months and I’ve been trying to figure out whether I’m going to keep it or not. I decided I’m going to keep it. It plays fantastic and it has a unique voice all its own. Thanks again for sharing your knowledge I really appreciate it. If anybody reads this and they modify guilds, drop by my YouTube channel and make a comment on Guild polara S100 mods. My channel is simply my name, Martin Vaccaro
Hi Gad,
I’m Steve Bloom, NYC guitar repairman.
My current client has a custom Tele with one Guild Neck Humbucker. Looks like a Fender version. However, no matter what I did, I could not get the 3-way blade switch to do Parallel/Series/Split. It seems to only work in standard humbucking mode. I thought I would give him 3 sounds from one pickup.
I can send you a picture of the back of the pickup before I did any work, if you want. Thanks so much for your posts! Very helpful!
Thanks! Sure – you can email them to gad@gad.net.